Imagine you’re at a local chili cook-off, and the winning dish is a robust blend of spices that warms you from the inside out. You might wonder what secrets go into crafting such a championship-worthy chili. While many recipes boast unique ingredients, the key lies in understanding the balance of flavors and textures. As you consider how to elevate your own chili game, you might find that mastering a few essential techniques can transform a simple pot into an award-winning masterpiece.
Tips and Tricks
- Use a base of sautéed onions, garlic, and bell peppers to create a rich flavor foundation for your chili.
- Brown 2 lbs of ground beef or lean meat for heartiness, ensuring a robust taste without overcrowding the skillet.
- Incorporate a blend of spices like chili powder, cumin, and paprika to enhance flavor complexity and boost metabolism.
- Simmer with crushed and diced tomatoes for at least 30 minutes to meld flavors and achieve the perfect texture.
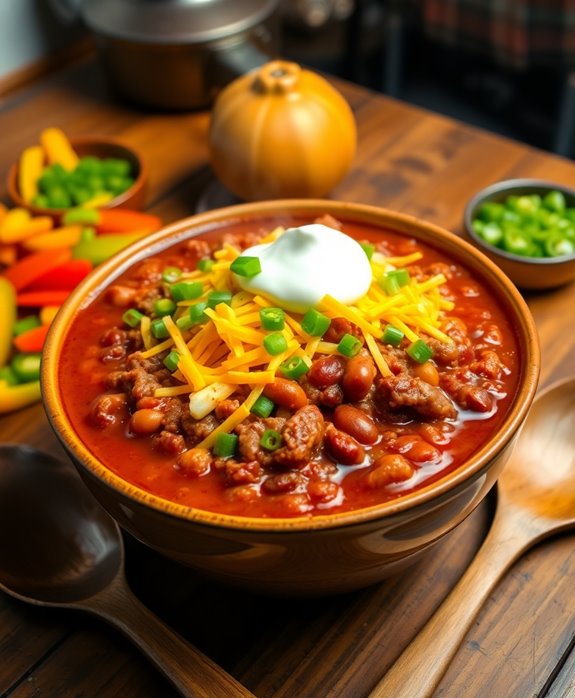
- Serve with optional toppings like shredded cheese and sour cream, and pair with cornbread for a complete meal experience.
History
Chili has a rich and flavorful history that warms the heart as much as the bowl it’s served in. Its origins can be traced back to the American Southwest, where Native American tribes combined local ingredients like beans, corn, and peppers to create hearty dishes.
As the Spanish settlers arrived, they introduced spices and meats, which further enhanced the flavor profiles.
You might be surprised to learn how regional variations have shaped chili over the decades. In Texas, for example, chili is often meat-centric, showcasing beef and a bold blend of spices without beans.
On the other hand, the chili from the Southwest may include various beans and even vegetables, reflecting a diverse culinary heritage.
In the Midwest, you’ll find a sweeter style, often incorporating tomatoes and a touch of sugar.
Each variation tells a story, influenced by local ingredients and cultural exchanges. As you immerse yourself in each bowl of chili, remember you’re savoring a dish that embodies a rich tapestry of history and tradition, connecting you to the many people and places that have contributed to its delicious evolution. Additionally, the famous Terlingua Chili Cook-Off has become a hallmark event, celebrating chili’s competitive spirit and bringing together enthusiasts from all over the country.
Recipe

Chili is the archetypal comfort food that warms the spirit, especially during brisk evenings or game days. This Championship Chili Recipe is crafted to impress your friends and family with its rich flavors and substantial ingredients. Whether you serve it at a tailgate party or a snug family dinner, this chili is sure to be a success.
With a perfect blend of spices, tender meat, and vibrant vegetables, you’ll find yourself reaching for seconds—and maybe even thirds! The allure of chili lies in its adaptability. You can adjust the ingredients to suit your taste, whether you prefer it spicier, meatier, or packed with beans and veggies.
This recipe combines ground beef, kidney beans, and a medley of spices that create a deep, savory flavor profile. Take some time to let the chili simmer, allowing the flavors to meld beautifully. Get ready to enjoy a bowl of hearty goodness that will have everyone coming back for more! Additionally, the use of spices enhances the overall flavor and character of the dish.
Ingredients:
- 2 pounds of ground beef
- 1 large onion, chopped
- 4 cloves garlic, minced
- 1 bell pepper, chopped
- 2 cans (15 oz each) kidney beans, drained and rinsed
- 1 can (28 oz) crushed tomatoes
- 2 tablespoons chili powder
- 1 tablespoon cumin
- 1 teaspoon paprika
- 1 teaspoon oregano
- Salt and pepper to taste
- 1 cup beef broth
- Optional toppings: shredded cheese, sour cream, chopped green onions
In a large pot or Dutch oven, brown the ground beef over medium heat until fully cooked. Drain excess fat, then add the chopped onion, garlic, and bell pepper. Sauté until the vegetables are tender, about 5 minutes.
Stir in the kidney beans, crushed tomatoes, chili powder, cumin, paprika, oregano, salt, pepper, and beef broth. Bring the mixture to a boil, then reduce the heat to low and let it simmer uncovered for 30-45 minutes, stirring occasionally. The longer you let it simmer, the more the flavors will develop.
When cooking chili, feel free to customize it to your liking. If you enjoy a spicier kick, add some diced jalapeños or hot sauce to the pot. For a smokier flavor, consider adding a bit of smoked paprika or a dash of liquid smoke.
Additionally, you can make a large batch and freeze leftovers for future meals. Just remember, chili often tastes even better the next day as the flavors continue to meld!
Cooking Steps
To kick off your championship chili, start by sautéing the onions and garlic until they’re fragrant and golden.
Next, you’ll add in the ground beef, letting it brown beautifully before stirring in that rich chili powder.
Finally, toss in canned tomatoes and let everything simmer together for 30 minutes, creating a mouthwatering blend of flavors. Additionally, consider adding a variety of beans to enhance the texture and nutritional value of your chili.
Step 1. Sauté Onions and Garlic

Sautéing onions and garlic is where the magic begins, infusing your chili with rich, aromatic flavors. Start by selecting your onion variety; yellow onions are a classic choice for their balanced sweetness, while red onions can add a vibrant touch.
Dice the onions finely, as smaller pieces cook evenly and release their natural sugars more effectively.
Heat a tablespoon of oil in a spacious skillet over medium heat. Once the oil shimmers, it’s time to employ your sauté techniques. Add the diced onions first, stirring occasionally. You want them to soften and turn translucent, which usually takes about 5-7 minutes. This step is essential, as it builds the foundation of flavor in your chili.
Next, introduce minced garlic—about 3-4 cloves should do the trick. Garlic cooks faster than onions, so add it after the onions have softened. Stir continuously for about 1 minute, allowing the fragrance to fill your kitchen.
Be careful not to let the garlic burn; it can turn bitter quickly. Once both ingredients are beautifully golden and aromatic, you’re ready to move on to the next step in crafting your championship chili. The right sautéing technique is crucial for achieving the perfect flavor balance in your dish.
Step 2. Add Ground Beef

Adding ground beef to your skillet brings heartiness and depth to your championship chili. Begin by choosing high-quality ground beef, preferably with a fat content of around 80/20 for the best flavor and texture.
Once your onions and garlic are perfectly sautéed, increase the heat to medium-high and add the ground beef to the skillet. As the beef hits the hot surface, you’ll hear that satisfying sizzle. Break it apart with a wooden spoon or spatula, making sure it’s evenly distributed. Stir occasionally, allowing it to brown thoroughly.
Cooking tips suggest not to overcrowd the skillet; if you’ve got a lot of beef, consider doing it in batches. This helps to achieve that perfect caramelization, enhancing the overall taste.
Keep an eye on the color; you want it to turn a rich brown. This process usually takes about four to six minutes. Once the beef is cooked through and no longer pink, drain any excess fat if necessary. Panera’s Turkey Chili recipe highlights the importance of using well-cooked meat for a robust flavor.
This step guarantees your chili won’t be greasy. With the ground beef ready, you’re now set to take your chili to the next flavor-packed level!
Step 3. Stir in Chili Powder
Now that your ground beef is perfectly browned, it’s time to kick the flavor up a notch by stirring in the chili powder. Grab your measuring spoon and add a generous amount—typically, about two tablespoons should do the trick—but feel free to adjust based on your preferred spice levels.
As you sprinkle the chili powder into the pot, let its vibrant red hue brighten your dish. Stir it in thoroughly, ensuring every morsel of beef is coated with that smoky, earthy flavor. This step is essential, as the chili powder infuses the beef with a rich depth, setting the stage for a mouthwatering chili.
If you’re feeling adventurous, consider experimenting with chili variations. You might mix in a bit of cayenne for extra heat or even a pinch of cinnamon for a unique twist. Each variation can transform your chili into something extraordinary, appealing to diverse taste buds. Remember, the quality of chili powder can greatly influence the overall taste of your dish.
Keep in mind that the spice levels can be adjusted throughout the cooking process, so taste as you go! This way, you can create a chili that’s tailored to your liking, making each bowl a delightful experience.
Step 4. Add Canned Tomatoes
The richness of your chili is about to get a significant boost with the addition of canned tomatoes. As you prepare to add these juicy gems, consider the different canned tomato varieties available. Diced tomatoes bring a nice texture, while crushed tomatoes create a smoother consistency. For those seeking a deeper flavor, opt for fire-roasted tomatoes, which add a smoky undertone that elevates your dish.
Open the can, and let the vibrant red color shine through. Pour the tomatoes into your pot, allowing the juices to mingle with the spices you’ve already stirred in. This is where the magic happens—canned tomatoes aren’t just a filler; they enhance the flavor profile of your chili dramatically. Their natural sweetness balances the heat and spices, creating a well-rounded dish that tantalizes your taste buds. Moreover, using quality canned tomatoes, such as San Marzano tomatoes, can elevate the overall taste even further.
Make sure to scrape the bottom of the pot to incorporate any flavorful bits stuck there. Stir everything together, and watch as the ingredients begin to harmonize.
With the addition of canned tomatoes, you’re on the path to a championship-worthy chili that’s bursting with flavor!
Step 5. Simmer for 30 Minutes

Allow your chili to reach its full potential by simmering it for 30 minutes. This essential step allows the ingredients to meld together, enhancing the overall flavor development.
As you bring your chili to a gentle simmer, you’ll notice the aromas filling your kitchen, inviting everyone to gather around.
Utilizing effective simmering techniques is key here. Keep the heat low enough to maintain a gentle bubbling; this prevents scorching while ensuring even cooking. Stir occasionally to help the flavors combine and prevent anything from sticking to the bottom of the pot. You might even consider covering the pot partially to retain moisture while still allowing steam to escape.
During this simmering period, the natural sweetness of the tomatoes, the robust spices, and the hearty meat will harmonize beautifully. Each ingredient has its moment to release flavors, creating a rich and complex chili that’s sure to impress. Additionally, using a variety of beans, such as mixed beans, can add both texture and depth to your chili.
After 30 minutes, taste your masterpiece. You may find that a pinch of salt or a dash of hot sauce is all it needs to reach perfection. Enjoy the anticipation as you prepare to serve your championship chili!
Nutrition Facts
When you whip up a pot of championship chili, you’re not just creating a hearty meal; you’re also dishing out a nutritious blend of ingredients. Packed with vegetables, beans, and lean meats, your chili offers a wealth of health benefits.
Each serving typically contains around 300-400 calories, depending on the specific ingredients you choose. This caloric content is balanced by the rich array of nutrients that come with it.
Beans serve as excellent protein sources, delivering both plant-based protein and fiber, which helps keep you feeling full and satisfied. If you opt for lean ground turkey or chicken, you’re adding high-quality protein that supports muscle health without packing on excess fat.
The tomatoes and peppers contribute vitamins A and C, essential for immune support, while spices like chili powder can boost metabolism. Additionally, incorporating hearty ingredients can enhance the overall nutritional profile of your dish.
Final Thoughts
A delicious bowl of championship chili can transform any gathering into a memorable feast.
Whether you’re hosting a casual get-together or entering chili competitions, this recipe offers a scrumptious way to impress your guests. You’ll find that the heartiness of beans, the warmth of spices, and the richness of meat create a symphony of flavors that delights every palate. Plus, a classic Rachael Ray chili recipe is sure to elevate your culinary game.
Don’t hesitate to explore flavor variations to make your chili unique. Experiment with different types of beans or add unexpected ingredients like chocolate or coffee for depth.
You can even adjust the level of heat by choosing milder or spicier peppers, tailoring your dish to suit your group’s preferences.
Frequently Asked Questions
Can I Use Turkey Instead of Beef in This Chili Recipe?
Yes, you can use turkey instead of beef in your chili. Turkey’s leaner nature offers health benefits, while its milder flavor creates a different taste profile. Adjust spices to enhance the dish’s overall richness and depth.
What Type of Beans Are Best for Championship Chili?
When choosing beans for your chili, black beans add a rich, earthy flavor, while pinto beans offer a creamy texture. Using a mix of both gives your dish depth and a satisfying bite. Enjoy the variety!
How Can I Make This Chili Vegetarian-Friendly?
To make your chili utterly phenomenal, swap meat for hearty vegetarian substitutes like lentils or mushrooms. Don’t forget to adjust your spices; a pinch more chili powder can elevate those flavors to heavenly heights!
What Toppings Pair Well With Championship Chili?
To elevate your chili, try shredded cheddar or crumbled queso fresco for cheese options. For a kick, add spicy toppings like jalapeños, diced serranos, or a drizzle of hot sauce. Your bowl will come alive with flavor!
How Long Does Leftover Chili Last in the Fridge?
Leftover chili lasts about three to four days in the fridge. For ideal leftover storage, keep it in an airtight container. Always check for signs of spoilage to guarantee your chili’s safety before enjoying it again.


