
Most people choose an island by how it looks and only later discover it does not fit how they live. A handsome waterfall slab is little comfort when there is no room to open the dishwasher behind it. The configuration, the shape, the levels, what is built in, matters far more than the finish.
Get the configuration right and the island becomes the hardest-working surface in the house; get it wrong and it just gets in the way. Here are seventeen island configurations worth considering, with the clearances, costs, and honest trade-offs to help you pick the one that actually suits your kitchen.
Pick the Configuration, Then the Finish
An island succeeds or fails on its configuration, not its looks. Start with the shape and the clearances your kitchen can give, then decide what the island needs to do: seat people, store things, hold an appliance, or all three.
Leave at least 36 to 42 inches of clearance on every walkable side, and build in only what earns its space. Get those bones right and any finish you choose will work; get them wrong and no waterfall edge can save it.
Choosing the Right Island Shape

The shape is the first and biggest decision. It has to answer to your floor plan before anything else. A long rectangle suits a galley or open run; a square fits a more compact, central kitchen; a curved or rounded end eases foot traffic in a busy room.
The rule that overrides taste is clearance: you need 36 to 42 inches around every walkable side, more on the cooking side. I measure that first on every job, then choose the largest shape that respects it. A quick tape-and-sketch pass takes about ten minutes and saves a costly mistake.
An island that crowds the walkways looks impressive and works terribly. The right shape is the biggest one your clearances allow. Not the biggest one you can picture.
Single-Level Islands for Simplicity

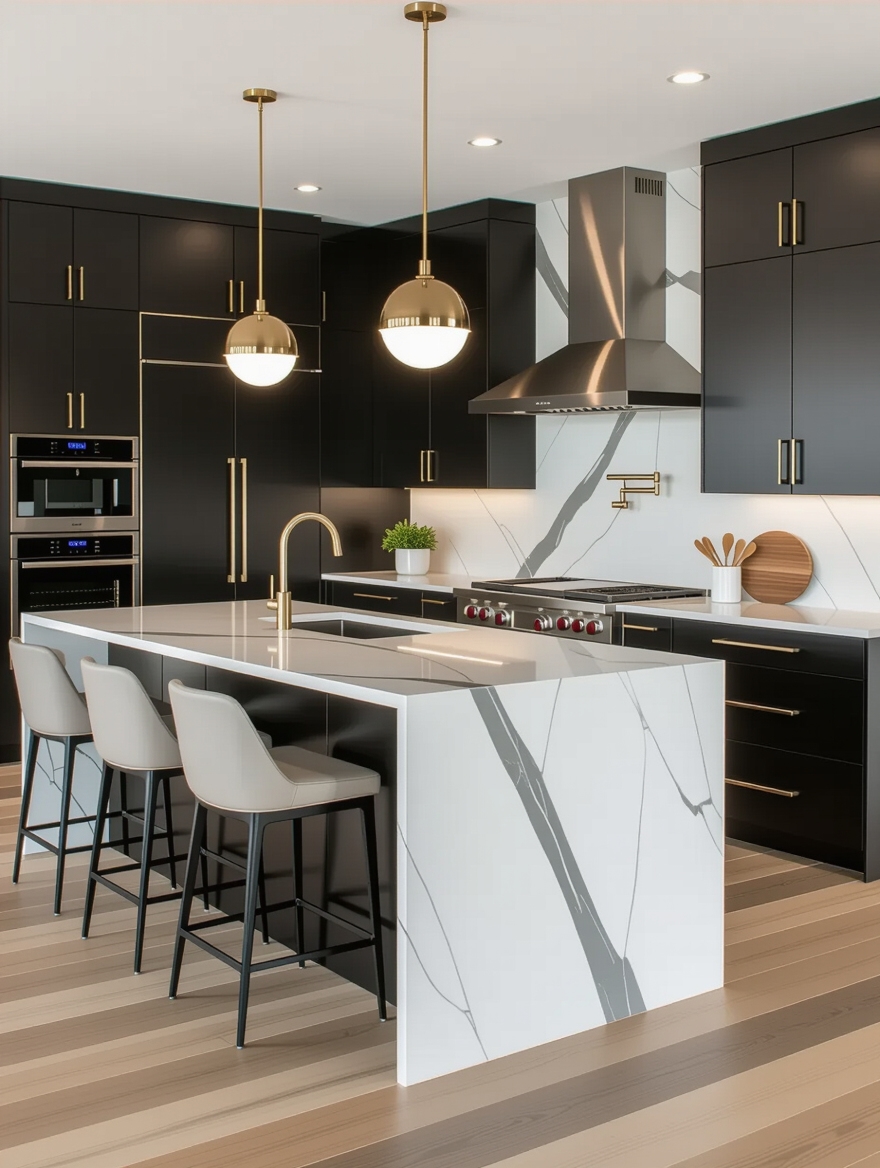
A single-level island, one continuous countertop at standard height, is the most current and most flexible configuration. It gives you the longest unbroken work surface, seats the most people, and looks cleaner than a stepped design, which is why it has largely replaced the old raised-bar setup.
It is the configuration I recommend to most clients now, and the one I steer toward whenever a kitchen is starting fresh, because nothing else gives this much usable surface for the footprint. Keep it at the standard 36-inch counter height and let the surface do double duty for prep and casual dining.
Two island myths worth dropping:
❌ Myth: Myth: bigger is always better.
✅ Reality: An oversized island that eats the walkways works terribly. The right size is the biggest your clearances allow, not the biggest you can imagine.
❌ Myth: Myth: every kitchen needs an island.
✅ Reality: A tight kitchen is often better with a slim peninsula or a rolling cart. Forcing a full island in is the most common configuration mistake.
Multi-Level Islands for Zones

A two-tier island has fallen out of fashion. It still solves real problems, though, so do not dismiss it on trend alone. The raised tier hides prep mess from anyone seated and gives a comfortable bar-height perch.
- Use a raised tier to screen cooktop splatter from the dining side.
- Keep the lower surface at 36 inches for real prep room.
- Choose levels for function, not fashion; single-level looks more current.
Adding Seating to Your Island

Seating turns an island into the social heart of the kitchen. It only works with the right overhang and spacing. Skimp on either and the stools become a place no one actually sits. Comfort decides it.
- Allow 12 inches of knee clearance for counter-height seating.
- Give each stool about 24 inches of width to feel comfortable.
- Support a stone overhang with a hidden steel bracket so it will not crack.
| Shape | Best For | Watch For |
|---|---|---|
| Single-level rectangle | Most kitchens; max seating | Needs a long enough run |
| L or U shape | Large open-plan rooms | Demands real floor space |
| Rolling / portable | Small or rented kitchens | Less storage than built-in |
Islands With Built-In Storage

Storage is where an island quietly earns its cost. Plan the base before you fall for the top. Deep pot drawers on the cook side, a pull-out for trash and recycling, and a shallow utensil drawer near the seating turn the island into the most useful storage in the room.
Plan the Base, Not Just the Top
Open shelving on an island looks airy in photos and becomes a dust trap in real life; closed storage keeps it sharp.
Every linear foot of the base should earn its keep with a drawer, a bin, or a cabinet. That is the configuration choice you will appreciate every day.
Islands With Built-In Appliances

Building an appliance into the island turns it into a second kitchen, but it is the configuration that needs the most planning, since power or plumbing has to reach the island before the floor goes down. A microwave drawer, a beverage fridge, or a prep sink are the usual choices.
I tell clients to decide this early, because running a line to a freestanding island later is far more expensive than doing it during the build.
- A microwave drawer or beverage fridge frees the perimeter; plan the power first.
- A prep sink needs plumbing run to the island, a remodel-stage job.
- Build in only what you reach for daily; the rest can stay on the perimeter.
🅰️Single-Level
The current, flexible choice: longest work surface, most seating, cleanest look.
🅱️Multi-Level
Less fashionable but useful: hides prep mess from the dining side with a raised bar.
Portable Islands for Flexible Layouts

When a built-in island will not fit or the budget will not stretch, a portable one is the smart configuration. A rolling cart or a small island on locking casters adds prep space, storage, and a serving spot, then rolls aside when the floor is needed.
It is the most flexible option there is. It is also the only one you can take with you when you move.
- Choose locking casters so it stays put while you work.
- Look for a shelf or drawers to add real storage.
- A portable island runs about $150 to $500 and needs no construction.
Maximized Space With Social Zones

For larger kitchens, an L-shaped or U-shaped island wraps the workspace around you and carves out a clear social zone. The extra angle adds counter and storage while defining where guests gather versus where you cook, which is why these configurations suit open-plan homes so well.
They demand real floor space, though, so they belong in a generous room rather than a tight one. Keep the clearances honest on every side.
- An L-shape adds a prep wing and a separate seating run.
- A U-shape surrounds the cook with workspace; it needs a big footprint.
- Both define a social zone in an open-plan kitchen.
Breakfast Bars and Social Islands
Combining the island with a breakfast bar is the configuration that makes everyday life easier, giving you one surface for prep, casual meals, and homework. An overhang on one end with a few stools turns the island into the spot the family actually uses, no separate table required.
- Extend the counter on one end for a built-in breakfast bar.
- Keep the seating side clear of the cooktop and sink.
- One surface for prep and meals saves space a separate table would take.
Sleek Waterfall-Edge Islands

A waterfall edge runs the countertop down the sides to the floor. It is the configuration that reads most modern and most custom. It shows off a beautiful stone and gives the island a clean, architectural look, though it adds real cost for the extra material and fabrication.
- A waterfall edge adds roughly $1,500 to $3,000 in material and labor.
- It suits a single-level island and a stone with strong movement.
- Skip it on a busy family island where the sides take daily knocks.
Smart Tech and Mixed Materials
Two finishing configurations push an island further. Building in smart features, hidden charging, pop-up outlets, even integrated lighting, keeps the surface clear and modern, while mixing materials, a wood top on a painted base, or a stone counter with a metal accent, gives the island a custom, layered look.
Keep the tech to what you will use and the materials to one wood, one stone, and one metal. Both touches make an island feel bespoke without overcomplicating the build.
Compact Islands for Small Kitchens
Not every kitchen can take a full island, and forcing one in is the most common mistake there is. A compact island, slimmer and shorter, or a slim peninsula attached to the run, gives you prep space and storage without choking the walkways.
If even that is tight, a rolling island is the honest answer. The slim islands for small kitchens and these small-space solutions show how to get the function without the crowding.
Statement Islands for Entertaining
If your island is the star of an open-plan room, a statement configuration earns its place. A bold color, a dramatic stone, generous seating, and a built-in beverage cooler turn it into the natural gathering spot for a party, doing the work of an island and a bar at once.
Let it do real jobs beneath the drama. Build in storage and prep so it is not just a pretty slab. The luxury island materials and islands built for gathering show how to balance show and function.
Common Mistakes to Avoid
The biggest island mistake is sizing it for looks instead of clearances, then living with walkways too tight to open a dishwasher or pass another cook. Measure the clearances first, every time, and let them cap the size. The second mistake is a waterfall or waterfall edge on a hardworking family island where the exposed sides take constant knocks.
The third is forgetting the base: an island with a beautiful top and wasted, hollow storage underneath is a missed opportunity you notice daily. Plan the configuration around how you cook, not how it photographs, and the island will work for decades.
Kitchen Island Configuration Questions
?How much clearance do I need around a kitchen island?
Leave at least 36 to 42 inches on every walkable side, and a little more on the cooking side. Tighter than that and two people cannot pass, and opening the island drawers or nearby appliances becomes awkward.
?What island shape is best for my kitchen?
Match it to your floor plan: a single-level rectangle suits most kitchens and seats the most people, an L or U shape suits large open-plan rooms, and a rolling or compact island fits small or rented spaces. Let your clearances cap the size.
?Is a single-level or multi-level island better?
Single-level is the more current and flexible choice, with the longest work surface and the most seating. A multi-level island still helps if you want to hide prep mess from the dining side behind a raised bar, so choose by function.
Configure It for How You Cook
The best island is not the prettiest one; it is the one configured for your room and your routine. Start with the shape your clearances allow, build in only what earns its space, and the finish becomes the easy part. Skip that order and even a striking island gets in your way.
So measure your clearances first, decide what the island truly needs to do, and choose the configuration that fits both. Do that and the island will be the hardest-working, most-loved surface in your kitchen for years to come.


