
Walk into any showroom and a kitchen island runs three to eight thousand dollars. Spend a Saturday in your own kitchen instead, and the same workhorse, prep space, storage, and a place to gather, can cost a hundred bucks and a trip to the hardware store.
An island is the most satisfying DIY in a kitchen, because it is really just a sturdy box with a nice top, and there are a dozen ways to make one. These 15 weekend island projects run from a rolling cart you assemble in an hour to a stock-cabinet build that looks fully custom, each one sized for a real weekend.
DIY Islands, in Short
A kitchen island can cost thousands installed, or a weekend and a hundred dollars if you build it yourself. The trick is matching the method to your tools and space: a rolling cart for renters, a stock-cabinet base for the most island per dollar, or a repurposed dresser for a one-of-a-kind piece.
Every project here starts with two numbers. Leave 36 to 42 inches of walkway on every open side, and build to about 36 inches tall to match your counters. Get those right, pick a sturdy top, and a DIY island looks and works like a built-in for a fraction of the price.
Plan and Choose Your Island Wisely

Before you build anything, measure. The most common DIY island mistake is making one too big for the room, so it chokes the very traffic it was meant to serve.
Measure the Walkways First
Leave at least 36 to 42 inches of clear walkway on every open side, and more on the cooking side. Tape the island’s footprint on the floor and live with it for a day. Walk your real routine around it before you commit a single board. For a softer footprint, the curved island shapes buy back a few inches in a tight room.
Then pick the method to match your skills. No tools and renting points to a cart, basic tools and a weekend point to stock cabinets or a repurposed piece, and a saw and some confidence open up a full custom build.
Building a Rolling Cart Island

The rolling cart is the easiest island there is, and the only one you can wheel out of the way. Start with a sturdy utility cart or a flat-pack kitchen cart, add a butcher-block or wood top, and finish with locking casters so it parks solidly while you work.
I love a cart island for small kitchens and rentals, since it gives you prep space and storage with no permanent build. Dress it up with a coat of paint and nice hardware and it looks far pricier than it cost. The wheels do the rest.
- Start with a flat-pack cart or a sturdy utility base.
- Add a wood or butcher-block top and locking casters.
- Paint it and swap the hardware to lift the look.
Island-build terms worth knowing:
📖Overhang
The counter that extends past the base for knees; 12 to 15 inches for seating.
📖Toe-kick
The recessed notch at the floor so you can stand close, about 3 to 4 inches deep.
📖Locking casters
Wheels with a brake, so a rolling island parks solidly while you work.
A Repurposed Dresser Kitchen Island

An old dresser is one of the best island starts there is, already a sturdy box with drawers and character. I love a dresser island, and I built one of my favorites from a $60 dresser; the deep drawers hold more than most cabinets and the patina looks intentional. Find a solid wood one secondhand, often $40 to $150, top it with butcher block or a cut-to-size counter, and you have a one-of-a-kind island with real storage.
- Find a solid wood dresser, around $40 to $150 secondhand.
- Top it with butcher block or a cut counter that overhangs for seats.
- Paint or seal it, and add casters or feet for the right height.
Transform a Bookshelf Into an Island

A sturdy bookshelf, especially a low, deep one, flips into an island with almost no carpentry. Stood the right way, the open shelves become storage for baskets, books, and bowls, and a wood top turns it into a working counter.
Back the open side or face it toward the seating for display. A pair of matching bookshelves pushed back to back makes a generous, double-sided island for very little.
- Use a low, deep, solid bookshelf as a ready-made island base.
- Fill the open shelves with baskets and everyday bowls.
- Two back-to-back shelves make a wide, double-sided island.
The best DIY island is not the one with the most cuts. It is the one that starts with a sturdy box you did not have to build.
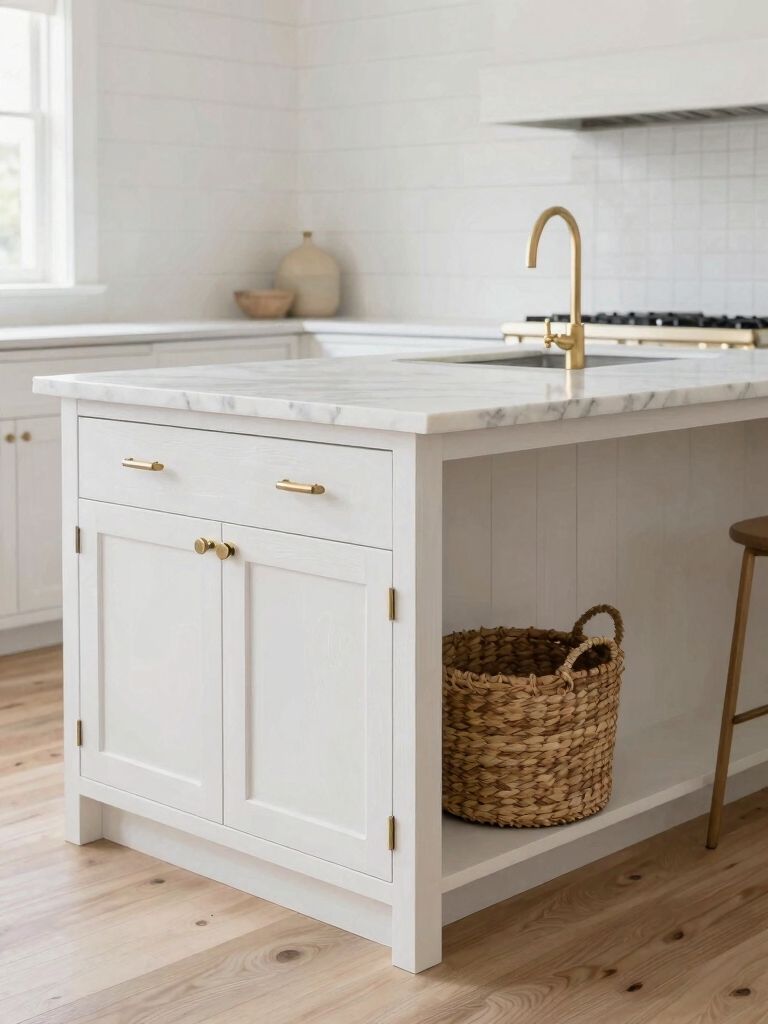
Assemble a Custom Kitchen Island

For the most island per dollar, build the base from stock cabinets. Two or three off-the-shelf cabinets screwed together, back to back or in an L, give you a fully custom-looking island with drawers and doors for a few hundred dollars.
Screw Stock Cabinets Together
Buy unfinished or ready-to-assemble base cabinets, level them on the floor, screw them to each other through the side panels, and anchor the whole unit so it cannot shift. Add end panels and trim to hide the cabinet sides and it looks like one built piece.
Finish with a counter that overhangs the seating side, then paint or stain to taste. This is the method that looks the most built-in, and it is well within a determined weekend. The modern island configurations show layouts you can copy with stock boxes.
A Compact Kitchen Island Transformation

Small kitchens need islands too, and a compact one just has to be sized right. A single 24-inch base cabinet works. So does a narrow rolling cart or a slim console table, giving you prep space and a little storage without blocking the room.
Keep it narrow, leave the walkways clear, and add a drop-leaf top if you want extra surface only when you need it. Even a tiny island changes how a small kitchen works. The small island ideas squeeze the most function from a few inches.
Heads-Up
Anchor any island that is not meant to roll, especially a tall or top-heavy one, so it cannot tip or slide. And if you plan to add an outlet or a sink to your island, that is a job for a licensed electrician or plumber and usually a permit. Do not improvise water or power yourself.
An Instant Kitchen Island Creation

When a whole weekend feels like too much, an instant island gets you most of the way in an hour. A console table at counter height, a kitchen cart out of the box, or a butcher-block top set on two ready-made cabinets all give you a working island with zero real building. I tell impatient friends to start here, since it is the fastest way to test whether an island even fits your kitchen before committing to a bigger build.
- Set a butcher-block top on two ready-made base cabinets.
- Use a counter-height console table as an instant island.
- Try an instant island first to test the footprint and flow.
A Sturdy Two-Tier Storage Island

If storage is the goal, a two-tier island doubles your options. A lower main counter handles prep while a raised back tier hides the mess from guests and adds a shelf or a bar. Build it by stacking a shallow cabinet behind the base or stepping two counter heights. The raised tier is also the easiest place to tuck a power strip or a row of hooks, and it is the most functional island shape for a busy, storage-starved kitchen.
- Add a raised back tier to hide prep mess and add a bar.
- Use the lower tier for working, the upper for serving or seating.
- Tuck storage, hooks, or a power strip into the raised back.
A Custom Butcher Block Island

Whatever base you choose, the top makes the island, and butcher block is the DIY favorite for good reason. It is warm, forgiving to cut to size, sands clean for decades, and runs $40 to $100 a square foot, far below stone.
A big-box butcher-block counter cut to your island size is the best-value top there is. Buy one slab and cut it down. I recommend oiling it before its first use and every month or two after, which keeps it sealed and only improves it with age.
- Butcher block is warm, affordable, and easy to cut to size.
- Buy a big-box slab and trim it to your island footprint.
- Oil it on day one, then every month or two to keep it sealed.
A Salvaged Cabinet Farmhouse Island
Salvaged cabinets and old furniture make the most characterful islands of all. A reclaimed base cabinet, an antique workbench, or a length of old shop counter brings a patina a new build cannot fake. It is perfect for a farmhouse kitchen.
Hunt architectural salvage yards, ReStores, and estate sales for a sturdy piece at the right height. Add a wood or stone top, clean and seal it, and a salvaged island anchors a kitchen with instant age. The island with seating guide covers sizing it for stools once the base is set.
- Source a base from salvage yards, ReStores, or estate sales.
- Choose a solid, level piece near counter height to start.
- Top, seal, and add stools for a characterful farmhouse island.
Choosing the Right Top
The base sets the price; the top sets the look. Butcher block is the easy, warm, affordable default, but a DIY island can wear almost anything. A remnant of quartz or granite from a fabricator gives you real stone for a small island at offcut prices, a sealed concrete pour looks modern, and even a sealed plywood top with a nice edge works on a budget.
Match the top to how you will use it. Butcher block if you want to chop right on it, stone or quartz if you bake and want a cool, durable surface, and any of them with a generous overhang if you are adding stools. Whatever you pick, the overhang and a clean edge are what make a DIY top look custom. The bar stool and island pairing covers the overhang and spacing for seating.
Make It Sturdy and Built to Last
A DIY island earns its keep by being rock-solid, so spend the extra ten minutes on the structure. Level the base on the floor with shims before you fasten anything, screw any multi-cabinet base firmly together, and anchor a stationary island to the floor through the toe-kick so it never shifts under a hard knead.
Then protect the surface for the long haul. Oil a butcher-block top on schedule, seal raw wood and concrete, and wipe spills before they soak in. A well-built island needs only this light attention to stay tight and good-looking for years, long after the weekend you spent making it.
A Weekend Now, an Island for Years
An island is the rare DIY where the payoff is daily and the savings are huge. Whether you wheel out a cart, repurpose a dresser, or screw together stock cabinets, you end up with the hardest-working surface in the kitchen for a fraction of the showroom price, plus the satisfaction of having made it.
So before you price out a custom island, ask the better question: which of these could you build this weekend with what you already have? Tape the footprint, pick your method, and start. The island you build yourself is the one you will be proudest to gather around.


