
The split-level kitchen I grew up with had a half-wall that chopped the room in two and a different floor on each side, and it always felt like two cramped kitchens instead of one. The remodel that fixed it did not add a square foot. It just stopped the two levels from fighting each other. Suddenly the whole space worked. I still remember the reveal.
That is the heart of a split-level remodel: tying the levels together so they feel like one room. These fifteen split level kitchen remodel upgrades cover the moves that actually change everything, opening the divide, unifying the surfaces, and bridging the heights, so a chopped-up kitchen finally flows.
What Ties the Levels Together
What is the biggest split-level upgrade? Opening or lowering the half-wall between the levels. It is the single change that turns two chopped spaces into one connected room, though it may be load-bearing, so check with a pro first.
How do you make two levels feel like one? Run the same flooring, counter, and color across both. Continuous surfaces trick the eye into seeing one larger space, not two small ones.
Do I need to move the levels? Rarely. Most of the impact comes from unifying finishes and opening the divide, not from re-pouring the floor heights, which is a major structural job on its own.
Remove the Half-Wall That Divides

The signature feature of most split-level kitchens is the half-wall that splits the room, and removing or lowering it is the upgrade that changes everything.
Opening that barrier lets light, sightlines, and conversation flow between the levels, so the kitchen finally feels like one connected space, the same payoff my genius ways to merge an open kitchen and living room guide chases. This is also the one move that may need a pro, since the wall could be load-bearing or hold wiring and pipes:
- Lower the half-wall to a counter or bar height to keep some division
- Open it fully, capped with a beam if needed, for a true connection between the levels
- Have a structural pro check it before anything comes down
- Pull permits, since this is real construction, not a weekend job
A Multi-Level Island That Bridges

Where a half-wall once divided the kitchen, a multi-level island can take its place and bridge the two heights it used to block. A two-tier island with a lower prep counter on the kitchen level and a raised bar on the upper side turns the split into a feature, giving you prep space, seating, and a connection across the divide all at once.
The raised bar screens the cooking mess from the dining view while letting guests perch and chat. Match the island’s materials to the rest of the kitchen so it looks like a planned centerpiece, not a patch over the old wall.
This is the upgrade that makes the split feel intentional. For more island formats, my small kitchen ideas modern homes are loving piece covers compact options too.
Run One Flooring Across Levels

Nothing screams two separate kitchens like two different floors, so running one flooring material across both levels is a quiet upgrade with outsized impact. A continuous floor creates a visual through-line that makes the whole space feel like one, and it is one of the most unifying changes you can make.
Luxury vinyl plank is the popular pick because it runs continuously, handles the step zone, and costs a fraction of tile or hardwood. Plan the transition where the levels meet with care:
- Choose one durable material, like luxury vinyl plank, for both levels
- Run the planks in the same direction across the change in height
- Use a flush threshold or a clean step nosing at the level change
- Pick a mid-tone that hides wear across high-traffic zones
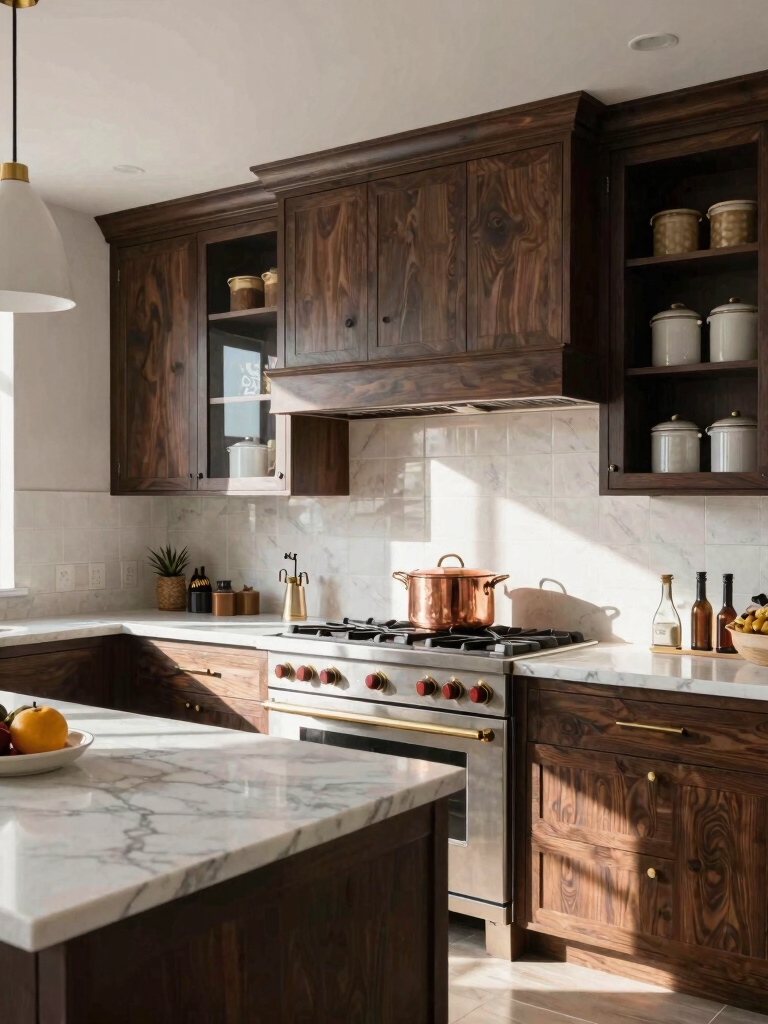
Cohesive Cabinetry Across the Split

When the cabinets on each level match, the eye stops seeing a divide and starts seeing one kitchen. Cohesive cabinetry, the same door style, color, and hardware on both levels, is what knits a split-level kitchen into a single design. Mismatched cabinets are often what made the old kitchen feel chopped up in the first place.
Same Style, Both Levels
Carry the same uppers and bases across the change in height, and let the hardware and trim repeat exactly. If the budget is tight, refacing or painting the existing cabinets a single color does most of the unifying work for far less than new boxes.
Consistency is the whole game here. For the storage logic inside those cabinets, my small kitchen storage ideas to hide clutter guide helps.
The fastest way to make a split-level kitchen feel like one room is to run a single floor across both heights. Two floors say two kitchens; one floor says home.
A Unifying Paint Color

Color is the cheapest way to tie a split-level kitchen together, and a unifying paint palette does most of the unifying for the price of a few cans. Painting both levels, walls, trim, and any open cabinetry, in one consistent scheme makes the eye flow from one height to the next without a hard stop. The divide softens the moment the color stops changing. One palette, one room.
Keep the contrast low and the palette light so both levels feel open and connected. Carry the wall color up any stairs or onto the half-wall remnant so that nothing visually breaks the flow between the two levels.
A single light tone across the whole space is the simplest upgrade with the biggest unifying payoff. Reach for one accent shared across both levels if you want a little color.
One Countertop on Both Levels

Just like the floor, a single countertop material on both levels builds a clean visual plane that makes the kitchen feel larger and more intentional. One stone or quartz running across the lower prep counter and the upper bar ties the two heights into one surface in the eye. Choose it for both looks and daily wear:
- One durable surface, like quartz, for both the prep and bar levels
- A consistent edge profile so the detail repeats across heights
- A mid-tone or veined pattern that hides crumbs and wear
- A waterfall edge on the island to ground the split visually
“What to settle with a contractor before you touch the half-wall: Is it load-bearing or does it carry wiring, ducts, or plumbing? What will it cost to open versus lower it, and will it need a beam? Does the work need a permit and an inspection? Get those answers before you swing a hammer at the wall that defines the room.”
A Backsplash That Carries the Eye Up

A split-level kitchen has interesting vertical lines, and a backsplash that runs tall uses them to connect the levels rather than fight them. Carrying one tile from counter to ceiling, or across both levels’ walls, draws the eye up and through the space, which makes a chopped kitchen feel taller and more unified.
One tile, run generously, does the connecting better than any divider ever could. Pick a pattern you love and let it carry from one height to the next:
- Run the same backsplash tile on both levels for continuity
- Take it to the ceiling on a feature wall to draw the eye up
- Choose a vertical-set tile to emphasize the height
- Keep the rest of the room calm so the backsplash leads
Maximize the Vertical Storage

Split-level kitchens often have generous ceiling height on at least one level, so maximizing vertical storage turns that height into usable room.
Taking cabinets to the ceiling and adding tall pantry units uses the wall a standard layout leaves empty, which clears the counters and adds the storage a busy family kitchen always needs. A single floor-to-ceiling pantry column can hold what a whole run of base cabinets does, in a slim footprint against one wall.
Build Up Where the Ceiling Allows
Reserve the top reaches for rarely used items and keep a slim step stool handy. Tall cabinets also frame the levels and make the change in height feel deliberate.
Use the taller level for the bulk storage and keep the lower one lighter. For the pro approach to all this, my small kitchen remodel ideas layout experts swear by guide covers the rules.
A Dedicated Prep and Pantry Zone
A split-level kitchen works best when each level has a clear job, so giving one a dedicated prep and pantry zone sharpens the whole flow. Assigning the lower level to cooking and prep and the upper to serving and storage, or whatever fits your home, keeps the two heights working together. The split becomes a feature when each level earns its purpose.
Decide the roles before you place a cabinet, since the layout follows the jobs. Keep the busy cooking work on one level and the calmer serving on the other, and the two heights stop competing for the same tasks:
- Put the main prep counter and cooking on the busier level
- Make the quieter level a pantry, coffee, or serving station
- Keep the work triangle on one level so cooking stays tight
- Use the upper level for a breakfast bar that faces the living space
| Upgrade | Effort | Unifying impact |
|---|---|---|
| One paint color | A weekend | High for the cost |
| One flooring | A few days | Very high |
| Cohesive cabinetry | Refacing or new | Very high |
| Open the half-wall | A pro and permits | The biggest change |
Open Shelving to Open the Levels

Solid cabinets on every wall can box in a split-level kitchen, so a run of open shelving lightens it and lets the levels breathe. Open shelves on a feature wall let sightlines pass through, which connects the heights and keeps the room from feeling like two closed boxes stacked together.
Place the open run where it spans the level change if you can, so the eye travels straight across the divide. My open-plan kitchen blueprints for airy homes guide leans into that openness. Style it to match across both levels. Keep it light:
- Open one run on a shared wall to connect the two levels visually
- Match the shelf material to the cabinetry for one cohesive look
- Keep the styling edited so it reads light, not cluttered
- Let the wall color show behind for a sense of depth
Two Levels, One Kitchen
The split-level kitchens that change everything are not the ones that fight the split. They embrace the split and unify it: open the divide, bridge it with an island, and carry one floor, one counter, and one color across both heights. Work with it, not against it. Do that, and two chopped-up spaces finally read as a single, intentional room.
So look at your split-level kitchen and ask what is actually dividing it, the wall, the floors, the mismatched cabinets, and start there. Which one change would tie your two levels together the most? Begin with that, and watch a kitchen that always felt like two finally feel like one.


