
Open most kitchen cabinets and you find the same story: a teetering stack of mismatched containers, three half-empty bags of flour, and a corner nobody has reached the back of in years. The fix is almost never more cabinets. It is a handful of cheap, repeatable organizing systems that finally give everything a home and keep it there.
These fifteen hacks are the ones that actually stick, because they work with how you cook instead of against it. For each I have noted what it solves and roughly what it costs, and most come in under fifty dollars. None require a renovation; they just make the cabinets you have finally behave.
Organizing That Sticks
Why does my cabinet organization never last? Usually because the system fights your habits. Organizing by how often you use things, and giving every item one clear home, is what makes it stick past the first week.
Do I need expensive organizers? No. Most of the biggest wins, zoning by frequency, clear containers, a lazy Susan, drawer dividers, cost under fifty dollars and install in minutes.
Where do I even start? Empty one cabinet, group what comes out by category, toss the expired and the duplicate, and put back only what earns its space. Start small and build.
Organize the Pantry by Category
The foundation of every lasting kitchen system is grouping like with like, so you always know where to look and where to put things back. Baking supplies together, snacks together, canned goods together, breakfast things together. It sounds obvious, but most pantries are organized by accident, which is why nothing ever stays put. Here is how to set the categories.
- Group by how you actually shop and cook: baking, snacks, cans, breakfast, pasta and grains.
- Give each category its own shelf or bin, so a returning item has one obvious home.
- Keep a small ‘use first’ bin at the front for things nearing their date, so nothing hides and expires.
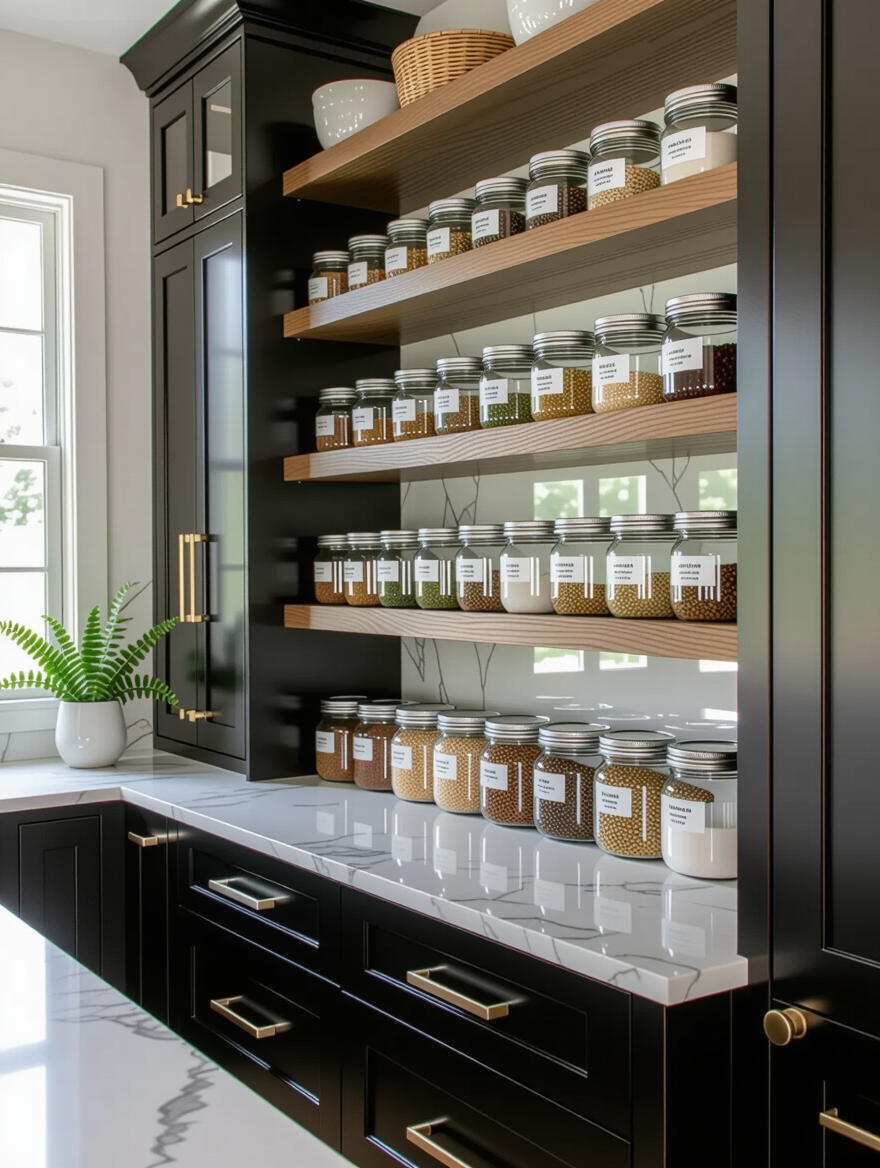
An Organized Kitchen With Clear Containers

Decanting dry goods into clear, uniform containers does two things at once: it shows you exactly what you have at a glance, and it squares off the wasted space that bags and boxes leave. A shelf of matching clear canisters fits more, looks calmer, and stops the mystery of three open bags of the same thing. Here is how to do it without overspending.
- Start with the staples you buy most, flour, sugar, rice, pasta, oats, rather than containerizing everything at once.
- Choose square or rectangular containers, which use shelf space far better than round ones.
- Buy one size or two, so they stack and line up, and a basic set runs well under fifty dollars.
The beliefs that keep kitchens disorganized.
❌ Myth: I just need more cabinets or a bigger kitchen
✅ Reality: Almost never. Most kitchens have plenty of space being wasted on dead air, unreachable corners, and clutter. Systems beat square footage.
❌ Myth: Organizing means buying expensive matching bins
✅ Reality: The biggest wins, zoning by frequency, grouping by category, using the door backs, cost little or nothing. Pretty bins are optional.
❌ Myth: If I organize once, it will stay that way
✅ Reality: Only with a light, regular reset. A system that fits your habits needs just a few minutes every week or two to keep humming.
Labeling Clear Containers Efficiently

Containers only stay organized if everyone in the house can tell what is in them and where they go back, which is what labels quietly do. A simple label, on the front or the lid, removes the guesswork that makes a system fall apart within a week, especially with look-alike white powders like flour, sugar, and baking soda. It is the cheap step people skip and then wonder why the order did not last.
Keep the labels practical. Add the item and, for baking staples, the date you opened or refilled it, so you can track freshness without digging. A basic label maker or even a roll of washi tape and a marker does the job for a few dollars, and writing on the back of a removable label means you can relabel as your staples change. The point is less about looking pretty and more about making the right place the easy place.
Eye-Level Storage for Everyday Essentials

Cabinet space is not equal, and treating it that way is why kitchens feel cramped. The eye-level and easy-reach zones are prime real estate, so the things you use every day, daily dishes, the coffee, the go-to spices, belong there, while the rarely-used items get banished up high or down low. Most people store by accident and pay for it with daily reaching and crouching.
Zone by How Often You Reach
Map your cabinets by frequency, not by what fit where on moving day. Walk through a normal morning and notice what you reach for most, then rezone so those things sit between shoulder and hip height, the easy-reach range. It costs nothing and an afternoon, and it is the rezoning that makes a kitchen suddenly feel bigger.
Push the special-occasion platters, the holiday bakeware, and the appliances you use twice a year to the highest shelves and the deepest corners. They earn their keep rarely, so they can live in the spots that ask you to stretch or bend. The daily things should never make you work.
Find the hack for your worst cabinet.
1Bags and boxes everywhere in the pantry
Group by category, then decant staples into clear, square containers and label them.
2A corner cabinet you cannot reach into
A lazy Susan or swing-out system, or assign the corner to your least-used items.
3Baking sheets and lids in a sliding heap
Vertical dividers, so each flat item stands on its edge and lifts out on its own.
Easy-Access Kitchen Storage

Half of cabinet frustration is simply that you cannot see or reach the back, where things go to be forgotten. A few cheap access tools bring the hidden depths forward, so you actually use what you own instead of buying duplicates of things lost behind other things. Here are the easy-access wins worth making.
- Add a turntable or lazy Susan for oils, sauces, and spices, so a spin brings the back bottle to the front.
- Use shallow pull-out bins on deep shelves, which let you slide the whole contents out rather than digging.
- Stand cans and jars in tiered shelf risers so you can read every label without moving the front row.
Maximize Corner Cabinet Space

The corner cabinet defeats almost everyone, a deep, awkward void you have to half-climb into to reach. A couple of targeted fixes turn that wasted corner into genuine usable storage, and they range from nearly free to a worthwhile retrofit. Here is how to reclaim it.
- Fit a lazy Susan to spin the whole corner out to you, the cheapest fix at around $40 to $120.
- Add a swing-out or pull-out corner system if the budget allows, bringing the back shelves fully forward.
- If neither fits, simply assign the corner to your least-used items, so the hard-to-reach spot holds what you rarely need. For more, see cabinet ideas worth stealing.
How to organize one cabinet so it actually stays organized.
1Empty and sort
Take everything out of one cabinet and group it by category on the counter. Toss the expired, the broken, and the duplicate as you go.
2Zone by frequency
Decide what earns the eye-level spot based on how often you use it, and send the rare items up high or down low.
3Contain and label
Give each group a bin or a clear container, label it, and put it back. The label is what tells everyone where things return.
Organize Baking Sheets Efficiently

The flat-stuff avalanche, baking sheets, cutting boards, muffin tins, and pan lids sliding into a leaning heap, is among the most universal cabinet annoyances. The fix is to store them vertically, on their edges, so each one stands separately and you can grab the one you want without toppling the rest. It instantly turns a chaotic pile into a tidy file.
A vertical divider rack, a tension-rod system, or even a sturdy magazine file does the job for a few dollars. Slot it into a tall, narrow cabinet or the space beside the fridge, and your sheets and boards stand upright and selectable. This single hack ends one of the daily clatters that makes a kitchen feel out of control, and it costs almost nothing to set up.
Organize Pots With Dividers
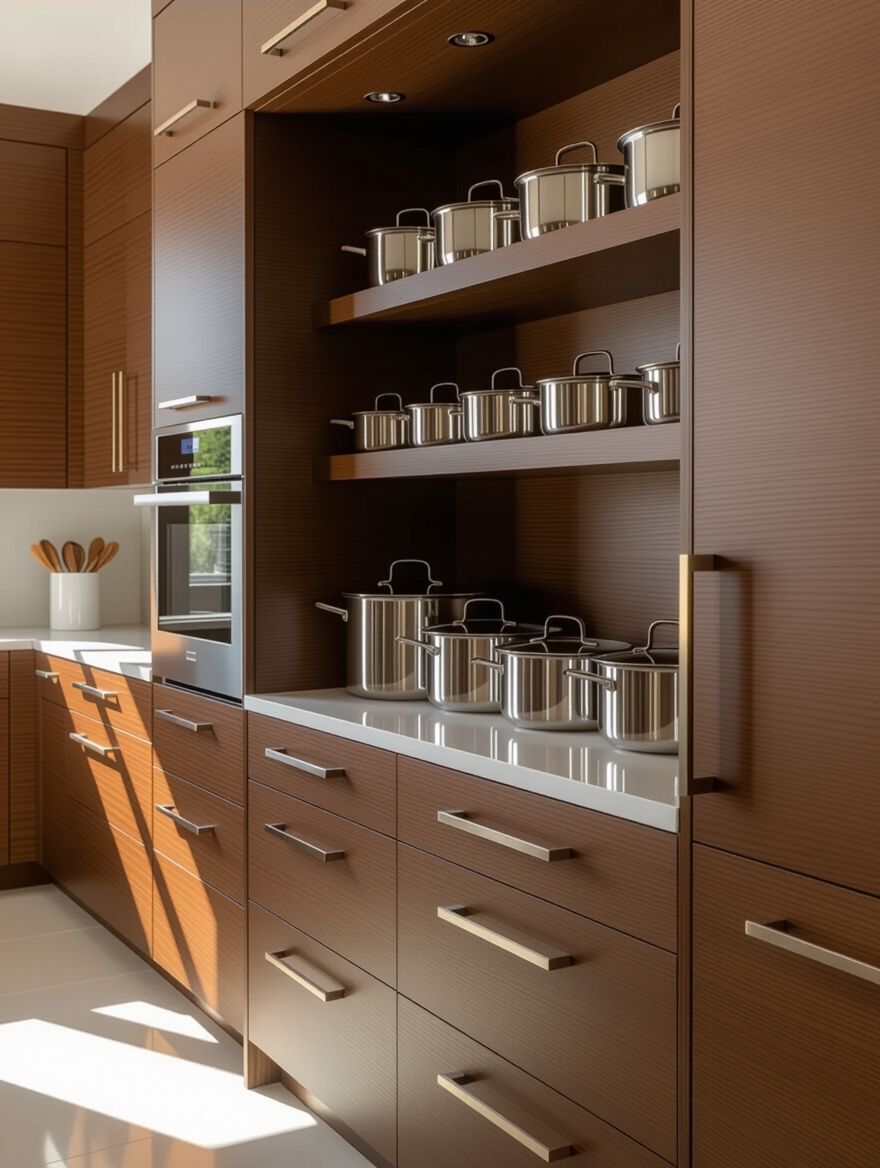
Pots and pans are heavy, awkward, and prone to the dreaded nested stack you have to dismantle to reach the one you need. Dividers and a few smart choices turn that wrestling match into a simple grab. The goal is for every pot to come out on its own, without lifting three others off it first.
These moves make pots behave.
- Store pots in a deep drawer with dividers if you have one, so they sit side by side and lift straight out.
- Use a vertical lid rack or a tension-rod divider so lids stand on edge instead of clattering loose.
- Hang the everyday pans on a wall rail or hooks, which frees the cabinet and keeps the favorites in reach.
Hooks for Hidden Storage

The most overlooked storage in any kitchen is the back of the cabinet doors, flat, empty real estate hiding in plain sight. Adhesive or screw-in hooks and slim racks on the inside of doors hold measuring cups, pot lids, cleaning gloves, and small tools, freeing up the shelves behind them. It is found space that costs a few dollars to claim.
Match the door-back storage to what is nearby. Mount measuring spoons inside the baking cabinet, cleaning supplies inside the under-sink door, pot lids inside the pots cabinet, so everything lives next to where it is used. A slim wire rack or a row of stick-on hooks turns dead door space into the handiest spot in the kitchen.
Mind the weight and the clearance. Stick to light items so adhesive hooks hold, and check that whatever you hang clears the shelves when the door closes. Done right, the doors quietly absorb all the small, annoying things that used to clutter the shelves.
Maximize Kitchen Storage, Top to Bottom

Once the systems are in place, the last hack is squeezing every inch out of the space you already own, top to bottom. Most kitchens leave the top third of each shelf as dead air and ignore the gap above the wall cabinets entirely, when both can hold real storage with a riser or a few baskets. The space is already there; it just needs claiming.
Work the vertical dimension everywhere. Shelf risers double the usable height inside a cabinet, under-shelf baskets hang storage from the shelf above, and matching baskets atop the wall cabinets hold the things you touch once a year while looking deliberate. Each is cheap and reclaims space you are already paying for.
The mindset shift is to stop thinking in shelves and start thinking in cubic space. A cabinet is a volume, not a set of flat surfaces, and the kitchens that feel spacious are simply the ones using the air between the shelves. For tiny kitchens especially, this is what doubles the storage. See ideas that double small-kitchen storage.
Maintenance & Care
The reason most organizing falls apart is not the system; it is the lack of upkeep, and the upkeep here is mercifully light. A quick reset every week or two, refilling the clear containers, returning the strays to their zones, and tossing anything expired, keeps the whole thing humming, and it takes only a few minutes once everything already has a home. The systems do the heavy lifting; you just nudge things back.
Twice a year, do a deeper pass. Pull everything from one or two cabinets, wipe the shelves with mild soap and a soft cloth, check expiry dates, and be honest about the gadgets and duplicates you never reach for.
Clearing out what you do not use is what keeps the cabinets from creeping back to chaos, since clutter expands to fill the space you give it. Keep the categories clear, the labels current, and the daily things at eye level, and a well-organized kitchen stays that way with almost no effort.
Systems Beat Square Footage
The brilliant thing about all fifteen of these hacks is that none of them require a bigger kitchen; they make the one you have work the way it always should have. Group by category, contain and label, zone by how often you reach, claim the corners and the door backs and the dead air, and a chaotic kitchen turns calm for a few dollars and an afternoon. The space was there all along, hiding behind the clutter and the habits.
Pick the one cabinet that frustrates you most every single day and fix just that one this weekend. Once you feel the difference, the rest tends to follow. Which cabinet are you finally going to tame first?


