
The first outdoor kitchen I ever planned was a secondhand grill, a paver patio, and a folding table that wobbled when anyone leaned on it. It fed a family of five all summer. That is the thing about a backyard outdoor kitchen: the budget gap between a weekend cart and a full built-in is enormous, yet the joy of cooking outside barely shifts. The 17 spaces below run from a $600 grill corner to a poolside build with its own bar.
I have grouped them by how people really live outside, from quick weeknight grilling to all-season hosting. Wherever it matters, I note what it costs and which utility lines you have to run first, because those small calls decide whether a space still gets used in year three.
Outdoor Kitchen Questions, Answered
How much does a backyard outdoor kitchen cost? A cart-and-counter corner lands around $500 to $1,500. A mid-range build with stone and a built-in grill runs $5,000 to $12,000, and a full kitchen with appliances and a roof often reaches $15,000 to $30,000. Most of that money goes to masonry, utilities, and weatherproof cabinetry, not the grill itself.
What materials actually hold up outdoors? Stainless rated for the outdoors, sealed natural stone or concrete, powder-coated aluminum, and marine-grade polymer cabinets all shrug off rain and sun. Skip indoor-grade MDF and bare wood, which swell and rot within a season or two.
Do I need permits or a professional? A freestanding grill cart needs neither. Once you add gas lines, plumbing, or a permanent roof, most towns require permits and a licensed plumber or electrician. Always check local code and hire a pro for gas and electrical work.
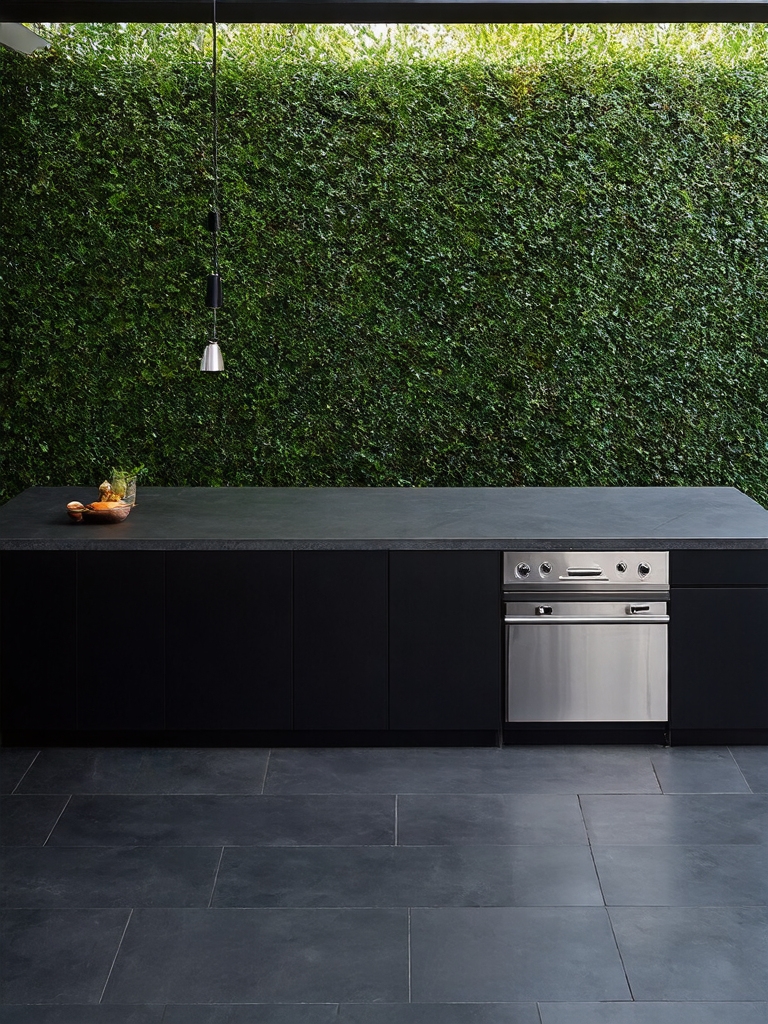
The Compact Grill Corner That Feeds a Crowd

You do not need a footprint bigger than a parking space to cook well outside. My first real setup was a three-burner gas grill beside a 24-inch counter cart, and it handled everything from burgers to sheet-pan vegetables. The move that makes a compact corner work is zoning.
You want a spot to prep, a spot to cook, and a spot to set down a hot pan, all within one easy step of each other. Here is how I would build one this weekend for under $900, and the same small outdoor kitchen design tricks apply whether you have a balcony or a half-acre.
- Anchor it with a reliable gas grill in the $300 to $600 range; that is the workhorse.
- Add a weather-resistant counter cart for prep and landing space right beside the grill.
- Mount a slim shelf or rail for tools, oils, and a spray bottle so nothing crowds the cook zone.
A Full Outdoor Kitchen With Real Appliances
When grilling becomes the way you cook five nights a week, a full build earns its keep. This is the tier with a built-in grill, a weatherproof refrigerator, a sink, and enough counter to plate a whole meal without ferrying dishes indoors. It is also where the budget jumps.
Expect $12,000 to $25,000 once you factor in masonry, a gas line, and GFCI-protected outlets. I once watched a client sink real money into a pizza oven they used twice, then admit the fridge was what spared them fifty trips inside a week. Put the money where you will actually stand.
- A built-in grill sized to your crowd; a 36-inch grate cooks for eight comfortably.
- A weather-rated fridge or drawer cooler kept within arm’s reach of the grill.
- A prep sink plumbed for cleanup; even a cold-water-only line helps a lot.
- Closed, weatherproof cabinets that keep tools and propane out of the rain.
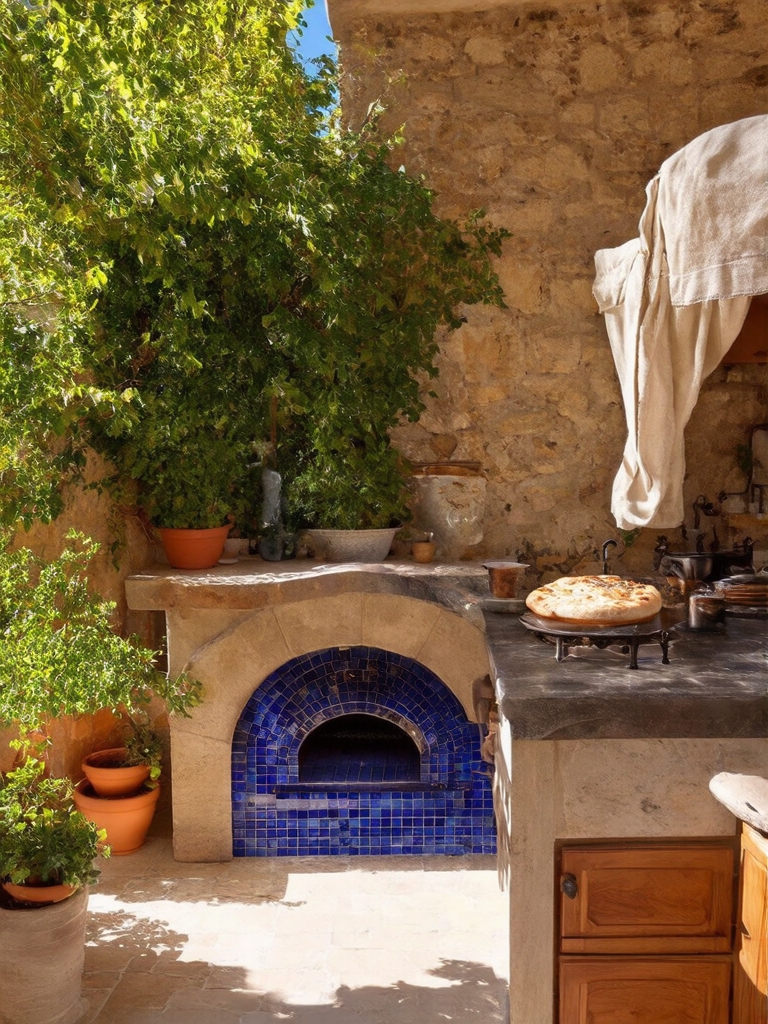
The Wood-Fired Pizza Oven Gathering Spot

A pizza night turns dinner into an event, and a wood-fired oven is the centerpiece that pulls everyone outside. You can buy a countertop model for $300 to $700 or build a brick dome from a kit for around $1,500. The learning curve is real.
Your first few pies will char before you get the hang of managing the fire and rotating fast. What I tell every first-timer is simple: light the fire a full hour ahead, and keep a peel and an infrared thermometer within reach the whole time you cook.
- Cure a new oven slowly with small fires for the first week so it does not crack.
- Aim for a floor temperature near 700°F for a 90-second, blistered crust.
- Stage dough, sauce, and toppings on a cart beside the oven so you never leave the fire.
🅰️Wood-Fired
Real smoke and a 900°F ceiling for blistered, leopard-spotted crust, but it needs seasoned hardwood, a longer warm-up, and some practice managing the fire.
🅱️Gas-Fired
Push-button heat and a steady temperature in about 15 minutes, much easier on a weeknight, though you give up some of the smoky char that wood delivers.
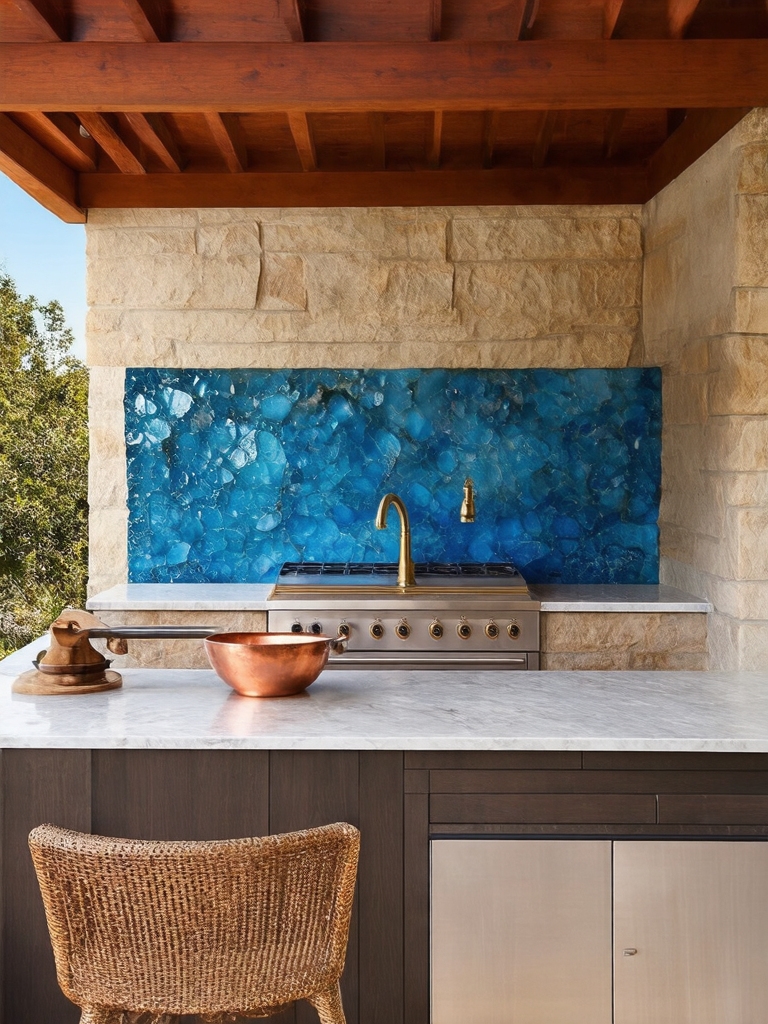
A Mediterranean Courtyard Cook Space
Some outdoor kitchens are about the food. This one is about the lingering afterward. A Mediterranean-leaning courtyard pairs warm stone and terracotta with a long table set under a pergola or an old olive tree.
The cooking core stays simple, often a grill and a counter, while the budget goes toward shade, planting, and a surface people want to sit around for hours. Sealed travertine or limestone underfoot takes heat and spills in stride, and a few potted citrus trees finish the mood.
- Lay sealed natural stone or terracotta tile that stays cool underfoot and ages well.
- Center the layout on a generous table; the meal is the point here, with appliances kept minimal.
- Add climbing vines or a pergola for filtered shade that softens the midday sun.
- Keep a warm palette of neutrals, ochre, and sage so the space reads calm.
The Covered Kitchen Built for Rainy Days
A roof is what turns an outdoor kitchen from a fair-weather toy into something you use two-thirds of the year. A covered pergola or a solid-roof extension lets you grill in a drizzle and shelters the appliances, which quietly adds years to their life.
The honest trade-off is light and cost. A solid roof can darken the cook space and the patio beside it, so plan for outdoor-rated lighting underneath and maybe a translucent panel or two. A simple covered structure runs $3,000 to $8,000 installed. For more roofed builds, the covered outdoor kitchen inspirations worth saving lean on airy posts and skip heavy walls.
An All-Season Setup With a Retractable Roof
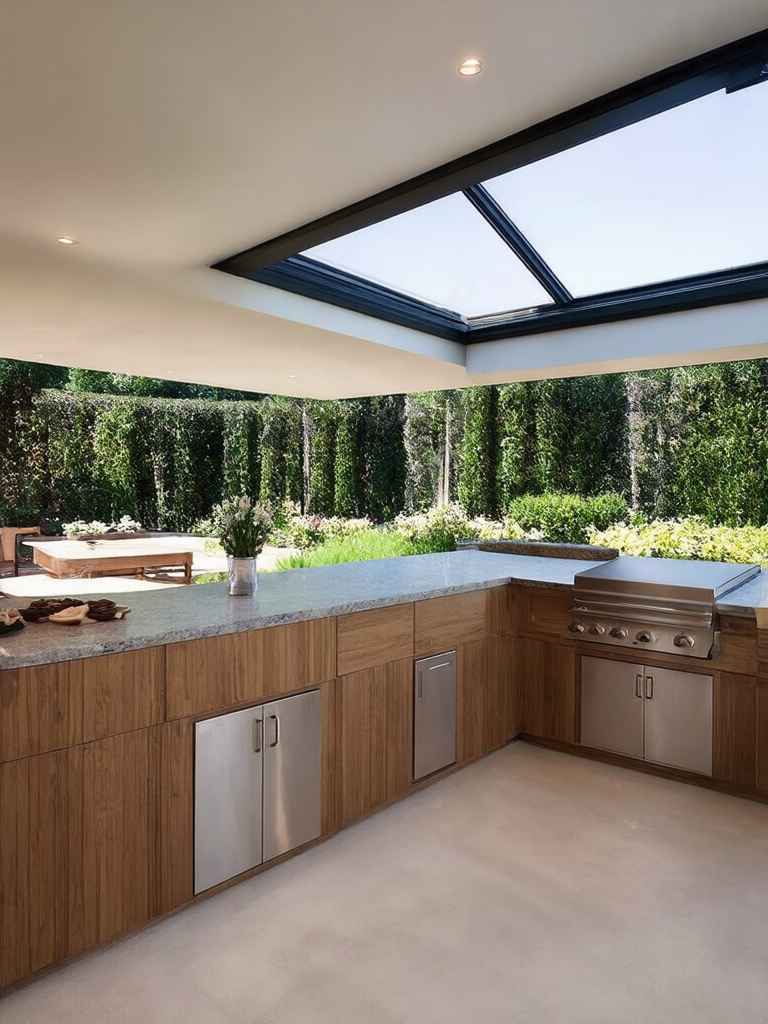
If you cannot decide between open sky and full cover, a retractable roof or louvered pergola hands you both. Motorized louvers tilt to vent heat, close against rain, and open flat for a clear night. It is the closest an outdoor kitchen comes to a four-season room without actually becoming one.
That flexibility costs real money and adds moving parts to maintain. A quality louvered system starts around $6,000 and climbs fast with size and motorization, so it makes the most sense for homeowners who host year-round. If you cook outside a few weekends a summer, a simple fixed cover does the job.
👍Worth it when
- +You host across seasons and want sun, shade, and rain cover on demand.
- +Your build includes appliances that benefit from overhead weather protection.
- +You can budget for motorized louvers and the occasional servicing they need.
👎Skip it when
- –You only cook outside a handful of weekends a year.
- –A fixed pergola or a shade sail would meet your needs for far less.
- –You would rather put the money toward better appliances or counters.
The Poolside Kitchen and Swim-Up Bar

A poolside kitchen keeps cooks and swimmers in one place, which is the whole point on a hot afternoon. An L-shaped counter with a built-in cooler means nobody tracks water through the house for drinks and snacks. A swim-up bar ledge, with submerged stools on the pool side, makes the deck feel like a small resort on a backyard budget.
Materials matter more here than anywhere else in the yard. Chlorine, splash, and constant sun are brutal on finishes, so lean on marine-grade polymer cabinets and sealed surfaces that wipe clean in a pass.
- Choose non-slip decking around the work zone to keep wet feet safe.
- Keep electrical well back from the water and on GFCI-protected circuits.
- Stock a small fridge with drinks so the cook never has to leave the poolside.
A Farmhouse Cook Space With a Fireplace

A fireplace changes what an outdoor kitchen is for. People stop clearing out after dinner. They pull their chairs close and stay, which makes this the layout I steer cool-weather hosts toward more than any other.
Keep the Materials Honest
The farmhouse version leans on honest materials: painted weatherproof cabinetry, a butcher-block or soapstone counter, and a stacked-stone or brick fireplace as the anchor. The look is warm and unfussy, and it hides a little wear far better than a high-gloss build ever will.
Budget the fireplace as its own line. A masonry wood-burner can run $3,000 to $8,000 built, while a gas insert costs less to run and lights with a switch. After years speccing outdoor builds, the feature people regret skipping most is enough hearth seating to make lighting the fire worth the trouble.
The Urban Rooftop Kitchen With a View

Rooftops and balconies turn the tightest square footage into the best seat in the city. The constraints are weight, wind, and access, so everything here stays compact and light, and a lot of it folds away. A small propane grill, weatherproof benches that double as seating, and a rolling cart cover the basics. Check your building’s rules on grills and load limits before you buy a single thing, because plenty of cities ban open flame on roofs outright.
- Pick an apartment-sized propane or electric grill that stores flat.
- Use benches and stools that hold cushions and tools inside the seat.
- Add string lights and potted herbs for softness without piling on weight.
- Confirm fire code and weight limits with your building before anything else.
The Budget Patio Kitchen You Can Build in a Weekend

You can build a patio kitchen you will use all season for the price of a single appliance in the luxury tier. Mine came together over two weekends with stock outdoor cabinets, a pre-cut counter, and a cart grill, for right around $1,200.
Where to Save and Where Not To
Save on cabinetry by using weather-rated stock units; custom masonry costs several times more. Save again on the counter with a sealed concrete paver or a remnant slab. Those two swaps carry most of the savings, and almost nobody notices the difference once string lights are up.
What you should not cut is anything touching gas, water, or power, because a cheap fix there gets expensive or unsafe fast. If you want proof a tight budget can still read high-end, the cheap outdoor kitchen ideas that look expensive worth copying all spend on one focal material and keep the rest plain.
📋A Weekend DIY Patio Kitchen Checklist
- ✓Level the patio base and confirm drainage runs away from the house.
- ✓Set weather-rated stock cabinets and a sealed counter for prep.
- ✓Place a cart grill and run only code-compliant gas or electric lines.
- ✓Finish with string lights, a stool or two, and a covered storage bin.
A Garden Kitchen With Built-In Herb Planters
Building herb planters right into the counter frame means you snip basil and rosemary as you cook, and the bed doubles as a green backdrop. Composite-wood frames take constant watering without rotting, and you can route the drainage straight into the soil below so nothing pools on the surface. It is one of the cheapest ways I know to make a plain build feel like yours; the garden kitchen outdoor setups worth a look pair edibles with real seating.
- Frame planters in composite or sealed cedar so daily watering will not rot them.
- Plant forgiving, high-use herbs: rosemary, thyme, mint, chives, and basil.
- Set the bed where it gets six hours of sun but will not shade your prep zone.
The Multi-Level Deck Layout for Tight or Sloped Yards
When a yard is small or sloped, stacking the kitchen on two levels buys you separation without more square footage. Put grilling and prep on the upper tier, where mess and smoke stay contained, and keep dining and lounging on the main level a few steps down.
The split also fixes foot traffic, since cooks get their own zone and everyone else has room to spread out. If you are weighing a deck build, the DIY outdoor kitchen builds worth studying show how a level change can hide a sloped grade and turn an awkward yard into the most usable part of the property.
What to Spend On, and What to Skip
The question clients ask me most is where the money actually goes. After enough builds, a clear pattern shows up in what people are glad they bought versus what gathered cobwebs. The money that pays off goes to the bones of the project: utilities run correctly, weatherproof storage, and a grill sized to how you really cook. The money that vanishes tends to chase single-use gadgets and pretty finishes that cannot take weather.
- Worth it: a right-sized grill, a weather-rated fridge, sealed counters, and real shade.
- Usually skip: built-in kegerators, a second pizza oven, and delicate tile.
- Spend first on gas, water, and GFCI power; retrofitting them later costs double.
- A solid middle path is the outdoor kitchen and patio combos worth planning around one anchor appliance.
Keeping an Outdoor Kitchen Running
An outdoor kitchen lives a hard life of sun, rain, and grease, and a little upkeep is what separates a five-year space from a two-year regret. None of it is hard. It just has to be regular, so I run a quick routine at the start and end of each season and a fast wipe-down after the big cooks.
- Clean grates after each use and deep-clean the grill twice a season.
- Cover appliances and reseal natural stone counters once a year.
- Have gas connections checked for leaks regularly, and call a licensed pro if you ever smell gas.
- Drain and shut off water lines before the first hard freeze.
Start Small, Then Grow Into It
The best outdoor kitchen is the one that matches how you actually spend time outside. A $600 grill corner you use every week beats a $25,000 build that sits under a cover. Pick the tier that fits this season, run the utilities right the first time, and leave yourself room to add on later.
Save the two or three ideas here that suit your yard, then take real measurements before you buy anything. The space that gets used for years is always the one planned around your own habits.


