

Most green kitchen inspiration comes with a catch: it assumes a full renovation and a contractor on call. The truth is that the looks people pin hardest are usually the ones built from small, copyable moves, a quart of paint here, a swapped pull there, a single shelf restyled. None of it needs a permit.
These sixteen ideas are sorted by how much weekend they ask of you. Some are an hour with a screwdriver; a couple are a two-day repaint. For each one I have noted the effort and a rough cost, so you can pick the project that fits the time and money you actually have right now.
Green Ideas by Effort and Cost
| Idea | Effort | Rough cost |
|---|---|---|
| Swap to brass or black hardware | 1 hour | $80 to $150 |
| Style green ceramics and a plant | 20 minutes | $0 to $40 |
| Repaint cabinets sage | A weekend or two | $200 to $600 |
| Add a green tile backsplash | A weekend | $10 to $25 per sq ft |
Soft Sage: The Weekend Repaint

If you copy only one idea here, make it a sage repaint, because it gives you the biggest change for the least risk. Sage behaves like a neutral, so it works in almost any kitchen, and its mid-tone hides the small brush marks a beginner leaves behind. A coat dries to the touch in about an hour, so a careful painter can finish a small kitchen over a weekend.
Keep it simple and the result looks bought, not made.
- Budget $200 to $600 in materials for a DIY repaint of an average kitchen.
- Use a bonding primer and cabinet enamel, and roll two thin coats instead of one thick one.
- Pair it with cream counters and warm wood for the calmest version. More on this in the sage everyone is loving.
Two-Tone for Easy, Low-Risk Elegance

Two-tone is the copyable idea for anyone who loves green but is scared to swim in it. Painting just the lowers green and leaving the uppers white or wood gives you a designer-looking kitchen while keeping the room airy at eye level. It is also half the painting of a full repaint.
A few moves keep it looking intentional.
- Put the green on the lowers, which take the most wear and gain the most from a fresh, durable coat.
- Run one hardware finish across both colors so the halves feel connected.
- Start with the lowers, live with them a week, then decide if the uppers need anything. See a fuller two-tone treatment.
Heads-Up
Before you fall for a sage you saw online, remember that greens shift hard under different light. The shade that looks perfect on a screen or a tiny chip can turn drab or gray in your actual kitchen. Buy a sample pot, paint a poster board in two coats, and live with it for a day or two before committing to gallons. A $6 sample is far cheaper than repainting a whole kitchen the wrong green.
Transform a Kitchen With One Green Island

Painting only the island is the lowest-stakes way to bring green into a kitchen, and it is the idea I suggest most to people who are not sure they will love the color. You get a real focal point, you keep the rest of the room exactly as it is, and you can repaint a single island in an afternoon if you change your mind. Here is how to make it land.
- Choose a shade with some depth, like forest or hunter, so the island reads as a deliberate anchor.
- Echo the green in one small accent nearby, a bowl or a tea towel, so it does not feel marooned.
- Top a painted island in butcher block for warmth, often under $200 for a small slab from a home center.
Transform Cabinets With Paint, Done Right

Paint is the most powerful tool in this whole list, and the one people most often rush. A green repaint can rival a five-figure renovation, but only if the prep is honest, because cabinets carry years of cooking grease that will reject paint if you skip the cleaning. This is the idea worth slowing down for.
The Order That Works
The sequence is short and forgiving once you respect it. Degrease, scuff-sand, prime, then roll two thin coats of cabinet enamel, giving each one a couple of hours to cure before the next. Take the doors off and label the hinges so you are painting flat and not fighting gravity.
If a deep or glossy green tempts you, know that those finishes show every flaw, so they reward spraying or a very patient hand. For a forgiving first project, a satin sage hides a multitude of small sins.
👍Why DIY painting wins
- +A fraction of the cost of new cabinets, often a few hundred dollars in materials.
- +Totally reversible later, since it is only paint.
- +Doable over a weekend or two with basic tools.
👎Where it gets hard
- –The prep is tedious and skipping it leads to peeling within months.
- –Deep and glossy greens show every brush mark and reward spraying.
- –Cure time means your kitchen is half-apart for a few days.
Layered Green Accents, No Paint Required

Not everyone can paint, and renters especially need green that comes and goes without a deposit fight. Layering removable green accents is the answer, and done well it looks considered and collected. The goal is a few echoes of the color around the room, so it feels woven in.
The Rule of Three
Think in threes. A stack of green stoneware on an open shelf, a runner or set of tea towels, and a couple of potted herbs give the eye three places to land, which is enough to make the kitchen feel deliberately green. Vary the shades a little so it looks collected.
The beauty of this idea is that it costs almost nothing and undoes in five minutes. It is also the best way to test whether you actually want to live with green before you commit a brush to a cabinet.
Matte Green and Brass for Quiet Polish
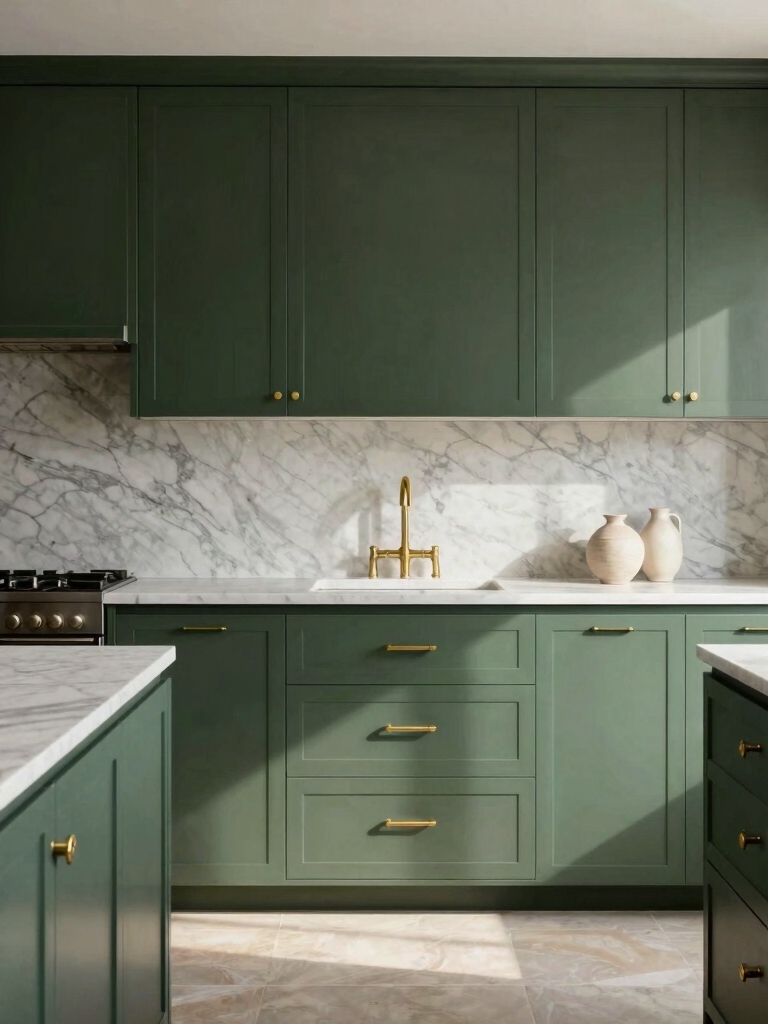
If your green already exists and just feels flat, the fastest fix is the metal. Swapping dull or chrome hardware for warm brass against a matte green adds an instant hit of polish for the price of pulls. It is a one-hour, one-screwdriver project with an outsized payoff.
- Budget $80 to $150 for a full set of budget brass-finish pulls and knobs.
- Choose unlacquered brass if you want it to age, or lacquered if you want it to stay bright.
- Carry the brass into the faucet or a light when you can, so it looks planned. See the greens that look expensive for more.
| Metal | Effect on green | Best with |
|---|---|---|
| Brass | Warm, vintage, a little glamorous | Sage, olive, emerald |
| Matte black | Crisp, modern, graphic | Sage, forest, mint |
| Aged bronze | Earthy, heritage, soft | Olive, moss, hunter |
A Sage Range Hood Upgrade

Wrapping or painting the range hood sage is a small, high-drama idea that turns a purely functional element into a focal point. It is contained, it photographs beautifully, and it gives you green without committing the whole run of cabinets to it.
- Paint an existing metal or plaster hood with a primer made for the surface, then a durable enamel.
- Keep the surrounding cabinets neutral so the sage hood stays the star of the wall.
- Add a slim brass strip or trim if you want the hood to feel custom and finished.
Brighten the Kitchen With Glass Fronts

Swapping a few solid upper doors for glass fronts is the idea that keeps a green kitchen from feeling closed in. The glass breaks up a wall of color, lets light move through, and gives you a spot to show off pretty dishes, all of which lighten a deep or fully green room.
Where to Put the Glass
You do not need new cabinets to do it. Many affordable cabinet makers sell seeded or reeded glass inserts that drop into existing door frames, turning a plain door into a designer-looking one for a fraction of replacement. Reeded glass also hides a slightly messy shelf, which is a real bonus.
Limit it to two or three doors so the effect stays special. A whole wall of glass fronts asks you to keep everything behind them perfect, which is a promise most of us cannot keep.
Styling Green Ceramics Creatively

The cheapest green idea on this list might be the green you already own. Pulling your green ceramics, glassware, and cookbooks out of the cupboard and onto open shelving brings color into the kitchen for nothing, and it is the easiest thing here to copy today.
Style It Like a Pro
Arrange with a little restraint so it looks styled and not cluttered. Group pieces by tone, leave breathing room around them, and mix heights so the eye has somewhere to travel. A single green vase with a few stems does more than a crowded shelf of odds and ends.
This is also a smart trial run. If a shelf of green pieces makes you happy every time you walk past, that is a good sign you will love the color on the cabinets too.
Vintage Green Tile Treasures

Vintage green tile is the idea for anyone who wants character money cannot buy new. Salvaged or reproduction tile in a soft jadeite or bottle green brings a depth and patina that fresh tile takes years to earn, and a small run of it as a backsplash or a single accent strip stays surprisingly affordable.
Hunt salvage yards, architectural reclaim shops, and online marketplaces, where a box of old tile can cost a fraction of new. A little goes a long way here, so even an odd-lot find is enough for a stove backsplash. For more tile inspiration, see the green tile that is pure eye candy.
Who It Suits Best
These ideas are not one-size-fits-all, and matching the project to your situation saves a lot of regret. Renters and the commitment-shy should start with the no-paint moves: layered ceramics, a styled shelf, glass-front inserts that swap back out, and removable accents. You get the green look with none of the risk to your deposit or your nerve.
Homeowners ready to commit get the most return from the paint projects, a sage repaint, a two-tone treatment, or a single bold island, since those change the room the most for the money.
And anyone on a tight budget or a tight schedule should lead with the hardware swap, which delivers the highest polish per dollar and per hour of any idea here. Whatever your situation, copy the one that fits the weekend you actually have, not the renovation you are imagining.
Quick Green Kitchen Questions
?What is the fastest green kitchen idea I can do today?
Swapping the hardware for warm brass or matte black, which takes about an hour with a screwdriver and runs $80 to $150 for a full set. If you want a no-spend option, pulling your green dishes and a plant onto an open shelf brings color into the room in twenty minutes for nothing.
?Can I get a green kitchen without painting anything?
Yes, and it is the right call for renters. Layer removable green accents, style green ceramics on open shelving, add a few potted herbs, and consider drop-in glass door inserts. Together these read as a deliberately green kitchen, and every piece comes back out without a trace when you move.
?Which green idea adds the most value for the least money?
A cabinet repaint in a muted shade like sage, paired with a hardware swap. For a few hundred dollars in materials you transform the most visible surface in the kitchen, and the look reads custom. For an even smaller budget, the hardware swap on its own gives the highest polish per dollar.
Pick One and Start This Weekend
The thing every idea here has in common is that you can start it now, with what you have, without a contractor or a permit. A green kitchen is not a single big decision; it is a stack of small ones, and you can take them one weekend at a time until the room feels like yours. The hardware swap alone will change how the kitchen looks before lunch.
Bookmark this, pick the one project that fits the time and budget in front of you, and let the next idea wait until you are ready. Which one are you copying first?
More Looks We Love


