
Can a U-shaped kitchen really fit an island? With the right room, absolutely, and the result is one of the grandest layouts there is. Three walls of cabinetry wrapping a generous center island gives you a double work triangle, room for two cooks, and a showpiece that anchors the whole kitchen. The trick is sizing it so the island feels grand rather than cramped, which comes down to clearance more than anything.
These nineteen U-shaped kitchen with island ideas walk through making that layout work: the room dimensions it needs, where to put the seating and the sink, how to style the island as a centerpiece, and the finishes that pull it all together. Get the proportions right and a U with an island becomes the heart of the home.
Sizing a U With an Island
| Element | Rule of thumb | Why it matters |
|---|---|---|
| Room size | At least 12 by 14 feet | Below this, the island crowds the U |
| Clearance | 42 inches around the island | Lets two cooks pass and doors open |
| Island size | Around 4 by 7 feet | Enough for prep, storage, and seats |
| Seating | 10-inch overhang, 24 inches per stool | Comfortable perch without blocking the aisle |
Built for Two Cooks
The reason a U-shape with an island feels so grand is that it can serve two cooks at once. The three perimeter walls hold one work triangle and the island creates a second prep zone, so two people can cook side by side without colliding. That is a luxury a galley or a plain U can never offer, two cooks working at once without ever colliding.
To make it work, give each cook a clear station and keep the paths between them open:
- A main triangle on the three walls, sink, stove, and fridge
- A second prep zone on the island with its own surface
- 42 inches of clearance between the U and the island
- A clear path so the two cooks never cross at the same spot
How Much Space a U With Island Needs

An island only feels grand in a U if the room is big enough to hold it comfortably, and that means starting at roughly 12 by 14 feet. Below that, the island eats the clearance and the layout feels cramped instead of generous. Above it, you have room for a real centerpiece with seating and storage.
Measure from the island to every leg of the U and keep that clearance generous all the way around, with extra room near the oven and dishwasher swings. If the math does not leave that, shrink the island or extend one leg into a peninsula instead. For the small-kitchen version of this, my small kitchen island ideas that maximize every inch guide helps.
| Room size | Verdict | What fits |
|---|---|---|
| Under 10 by 12 ft | Skip the island | A peninsula on one leg |
| 12 by 14 ft | Tight but workable | A slim 3 by 5-ft island |
| 14 by 16 ft plus | Grand and roomy | A full island with seating |
The Island as Command Center
In a grand U, the island is the command center, the spot where you spread ingredients, prep a meal, and gather everyone around. It is more than extra counter; it is the working and social heart of the kitchen, the surface you return to for every task and every conversation. Designing it well is what makes the whole layout sing, which is why I lay out the island before the perimeter on every grand U I plan; everything else has to give it room.
Give it a generous, uninterrupted top for real prep, storage below for the things you reach for most, and seating on one side so company can keep you company while you cook. The best islands do all three at once without feeling crowded. My small kitchen island ideas nobody talks about guide covers more island formats.
Balance Seating and Traffic

The hardest balance in a U with an island is fitting seating without choking the traffic. Get it right and guests perch comfortably while you work; get it wrong and stools block the only path between the island and the U. Plan the seating and the clearance together, not one after the other:
- A 10-inch overhang and 24 inches of width per stool
- 42 inches behind the stools so people pass when someone is seated
- Backless stools that tuck fully under to clear the aisle
- Seating on the side facing the room, away from the work triangle
Sink or Cooktop on the Island?

One big decision is whether to put the sink or the cooktop in the island, or to keep it a clean prep surface. Each choice changes the workflow and the look, so weigh how you cook against how much you want the island to stay clear. There is no wrong answer here. Pick the one that fits how you cook:
- A sink in the island puts cleanup at the social center, great for entertaining
- A cooktop in the island makes you face the room while you cook, but needs a hood
- A clean prep island keeps the surface open and the mess on the walls
- Either fixture in the island needs plumbing or venting planned early
In a U-shaped kitchen, the island is where the cooking happens and where everyone ends up standing. Get its size and clearances right and it becomes the heart of the whole house.
Inviting Island Seating

Seating is what turns a working island into a gathering spot, so it is worth getting comfortable. Island seating done right gives each stool real knee clearance, a stable footrest, and a material on the overhang that ties back to the cabinetry, so the perch feels like part of the design instead of an afterthought.
Comfort and Clearance Together
Give each seat real elbow room and a deep enough overhang for knees to slide under. Stools with backs are more comfortable for long sits; backless ones tuck away cleaner.
Place the seating on the side that faces the living space, so guests sit with their backs to the work zone and stay part of the room. That keeps the cook and the company connected. For island makeovers that open a room, see my small kitchen with island makeovers guide.
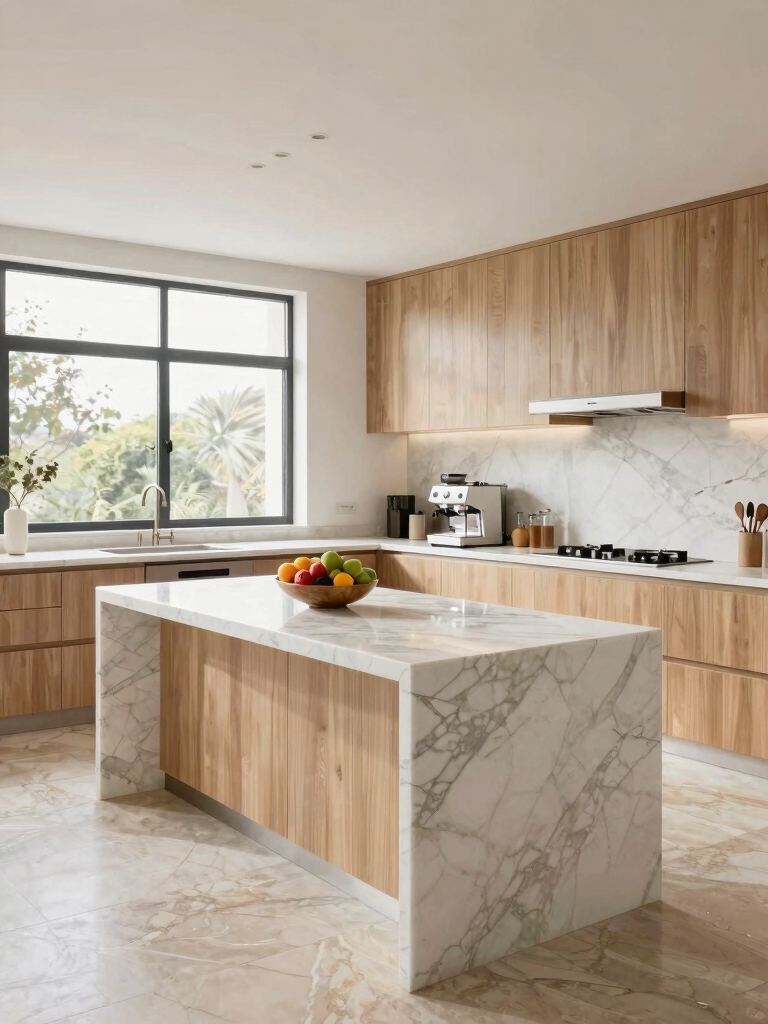
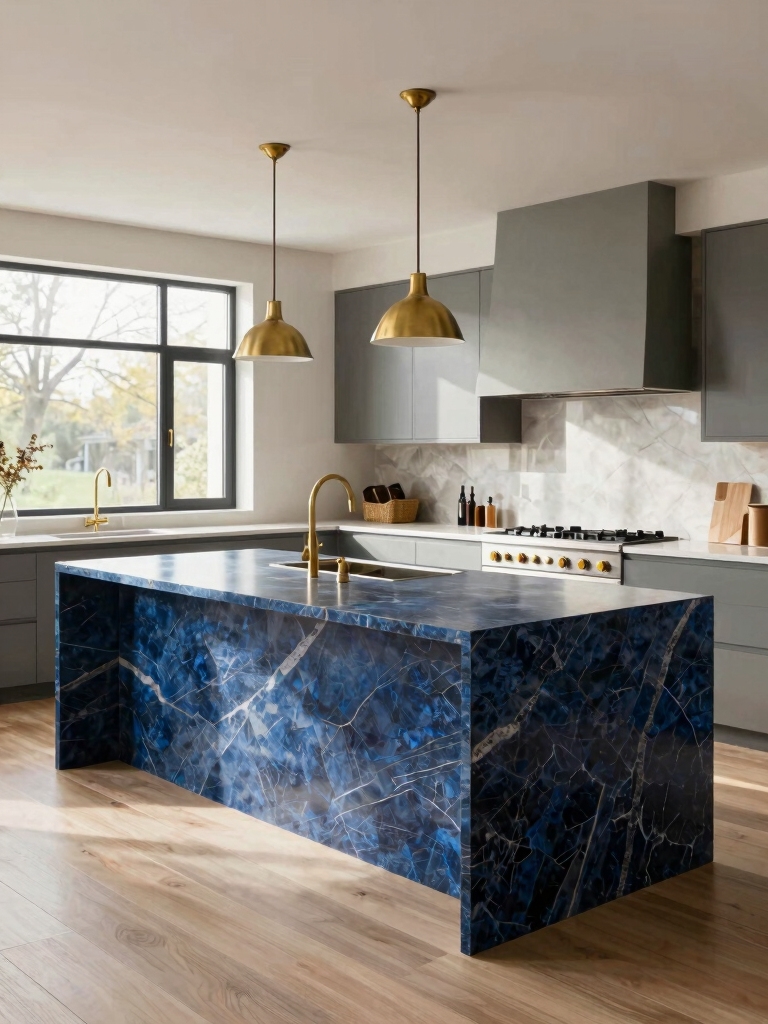
Match or Contrast the Island

A defining choice in a grand U is whether the island matches or contrasts the perimeter cabinetry. Matching the island to the surrounding cabinets unifies the space into one calm scheme, while a contrasting wood tone or painted color turns the island into a deliberate focal point. Both read as a deliberate choice; it comes down to how much drama you want.
Unify or Make a Statement
A popular middle path is to keep the perimeter quiet, a soft neutral, and let the island carry the color or a richer material. A statement counter on the island, against simpler perimeter tops, does the same job.
Whichever way you go, repeat the island’s finish somewhere else, in the hood, the hardware, or a shelf, so it reads as planned. For color-pairing ideas, my two tone kitchen cabinets that prove more is more guide helps.
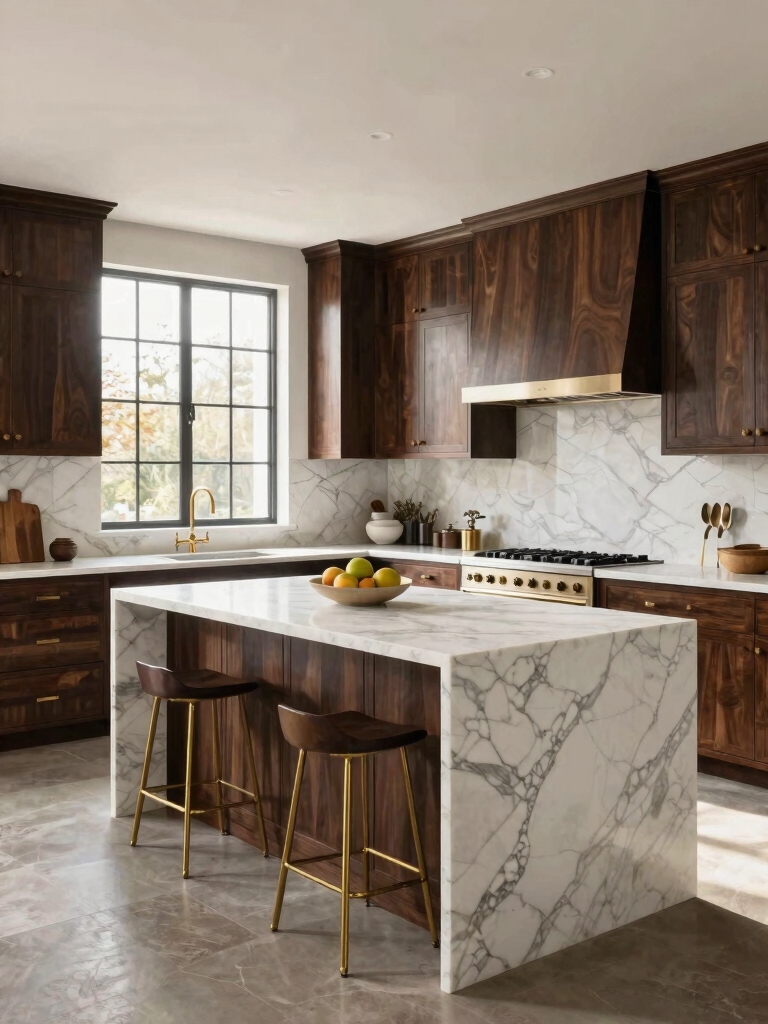
A Dramatic Waterfall Edge
For the grandest island look, a waterfall edge runs the countertop material down the sides to the floor, turning the island into a single sculptural block. The vein of marble or quartz carries vertically down each side and meets the floor in one clean line, which anchors the whole kitchen visually. It is the detail that looks custom and high-end:
- A continuous slab that wraps the counter down both ends
- A veined stone so the pattern flows from top to side
- A polished or honed finish to suit the rest of the room
- A bookmatched slab for the most dramatic, mirrored veining
👍Contrasting Island
- +Becomes a deliberate focal point in the room
- +Lets you try a bold color in one contained spot
- +Easy to repaint later without touching the perimeter
👎Worth Weighing
- –Can feel busy if the contrast is too strong
- –Needs to be repeated elsewhere to look planned
- –A matched island reads calmer in a small or busy kitchen
Concealed Storage in the Island

A grand island should look clean from the outside while working hard on the inside, which is where concealed storage comes in. Deep drawers, hidden bins, and integrated outlets behind flush fronts keep the island uncluttered and sculptural while holding the pots, recycling, and gadgets a busy kitchen generates. The beauty is in what you do not see: a sculptural block outside, a hardworking cabinet within.
Plan the interior to your habits so every drawer earns its place:
- Deep pot drawers on the cooking side of the island
- A pull-out bin for trash and recycling behind a flush panel
- An integrated outlet for charging or small appliances
- A hidden microwave drawer to free the perimeter counter
Integrate a Pantry

A grand U with an island still needs everyday storage, so integrating a pantry into the three walls keeps the work triangle clear while hiding the bulk. Tucking it into the least active leg, framed in full-height cabinetry, gives you a generous pantry that disappears into the run. The key is placement that keeps the flow intact, which usually means tucking it into the quietest leg.
The end of a run framed with full-height cabinetry reads as built-in and elegant. A two-tier swing-out turns a dead corner into a pantry behind a clean facade. A tall, narrow pull-out nestles between two appliances where nothing else fits.
Done well, the pantry adds capacity without stealing from the grand, open feel. For more ways to hide the bulk, my small kitchen storage ideas to hide clutter guide helps.
What to Expect From the Project
A U-shaped kitchen with an island is a substantial project, so it helps to set expectations. You need a truly large room, at least 12 by 14 feet, plus the budget for an island that often involves plumbing or venting if it holds a sink or cooktop.
The island itself, with a stone top and custom storage, is usually one of the priciest single elements in the kitchen, often $4,000 to $10,000 or more depending on size, stone, and whether it carries a sink or cooktop.
Plan the layout and the clearances on paper first, since an island that is even a few inches too big turns a grand kitchen into a cramped one. And leave anything involving moving plumbing, gas, or electrical to a licensed pro who can pull the right permits.
Get the proportions and the pros right, and a U with an island rewards you with the most functional, gathering-friendly kitchen there is. For the design language to tie it together, my small kitchen ideas modern homes are loving piece covers the finishes.
U-Shape With Island Questions, Answered
?How big does a kitchen need to be for a U-shape with an island?
Aim for at least 12 by 14 feet. You need 42 inches of clearance between the island and all three legs of the U, plus room for the island itself, around 4 by 7 feet for a generous one. Below 12 by 14, the island crowds the layout, and a peninsula on one leg usually works better.
?Should the island in a U-shaped kitchen have a sink or cooktop?
It depends on how you cook and entertain. A sink in the island puts cleanup at the social center; a cooktop lets you face the room but needs a hood overhead. A clean prep island keeps the surface open and the mess on the walls. Any fixture in the island needs plumbing or venting planned in early.
?Should the island match or contrast the cabinets?
Either works. Matching the island to the perimeter unifies the room into one calm scheme; a contrasting color or wood tone makes the island a focal point. A popular path keeps the perimeter quiet and lets the island carry the color or a statement counter. Repeat the island’s finish elsewhere so it looks planned.
Three Walls and a Centerpiece
A U-shaped kitchen with an island is the layout that has it all, when the room can hold it: a double work triangle for two cooks, a sculptural centerpiece, generous storage on three walls plus the island, and a gathering spot at the heart of the home. The whole thing rises or falls on the clearances, so the proportions matter more than any finish.
So measure your room first and be honest about whether it can give the island 42 inches all the way around. Which would you want at the center, a prep island, a sink for entertaining, a cooktop facing the room? Decide that, size it generously, and a U with an island becomes the grand, hardworking heart your kitchen was built around.


