
The myth about kitchen islands is that any island makes a kitchen better, and bigger is always more. Plenty of islands actually hurt a kitchen, choking the traffic or floating uselessly in the middle. The kitchen islands everyone copies are the ones that get a few specific things right, and once you see the pattern, you cannot unsee it.
A copy-worthy island is sized to its room, styled to match the kitchen, and loaded with real function, storage, seating, sometimes a sink. Below are the island setups that keep showing up because they work, organized by style, with the details that make each one worth stealing and the clearances that keep them from backfiring.
What Every Copy-Worthy Island Gets Right
- A great island is sized to the room first, with 36 to 42 inches of clearance, not crammed in because you want one.
- The setups everyone copies share a few moves: a contrasting or two-tone base, a thick or waterfall top, and seating on the living side.
- Match the island style to the kitchen, classic white, rustic wood, bold color, or sleek minimal, so it anchors the space.
- Build in real function: storage on every face, an overhang for stools, maybe a prep sink or microwave drawer.
The Inviting, Multifunctional Kitchen Island
Before the styles, here is what every great island has in common: it does several jobs at once and never blocks the room. The best ones pack in a lot. Storage on every face, a generous prep surface, seating for two to four, often a sink or cooktop, all while leaving clear paths around them.
The non-negotiable is clearance, 36 to 42 inches on every side, since the most beautiful island fails the moment people squeeze past it. I have learned to lock the size and clearance before falling for a finish, the same priority behind any island design worth bookmarking.
- Pack in storage, prep space, and seating so the island earns its footprint.
- Keep 36 to 42 inches of clearance on every side, no exceptions.
- Decide early if it carries a sink or cooktop, since that drives plumbing.
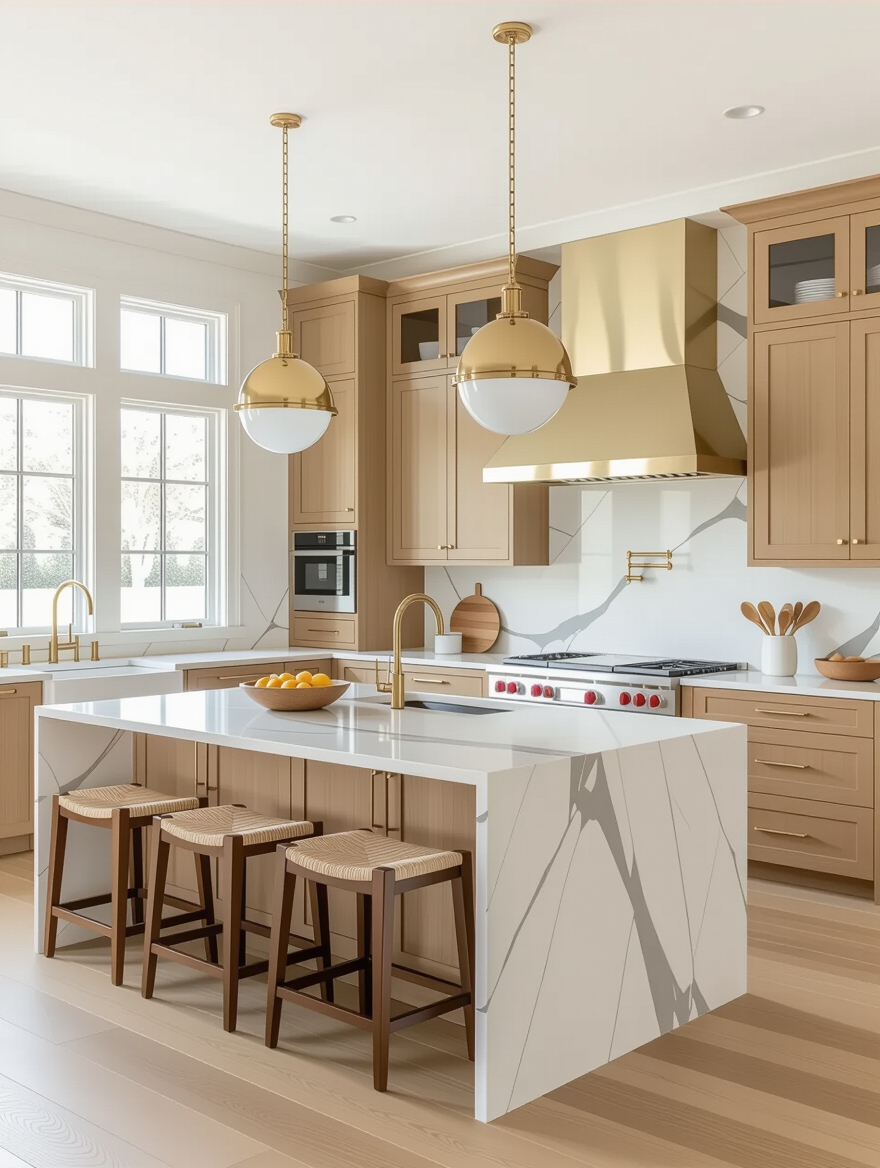
Classic White Islands With Timeless Elegance

The white island never goes out of style. That is exactly why it shows up everywhere. A white or off-white base with a marble-look stone top looks clean, bright, and timeless, and it works in almost any kitchen.
The copy-worthy trick is a subtle contrast: pair white perimeter cabinets with a slightly warmer or grayer white island, or top it with a stone that has just enough veining to feel custom. Add brass or matte-black hardware and a couple of woven stools, and you have the setup that sells houses. Safe here means it will still look right in fifteen years.
- Pair white cabinets with a slightly contrasting white island so it stands out.
- Top it with a veined stone for a custom, timeless look.
- Warm it with brass or black hardware and natural-fiber stools.
ℹ️Good to Know
A standard island runs about 36 inches tall and at least 40 by 40 inches to be useful, but you need roughly 7 by 13 feet of free kitchen floor to fit one with proper clearance. Smaller rooms are better served by a slim island or a peninsula.
Warm Wood and Stone Island Elegance

Wood and stone is the pairing people reach for when they want warmth with a high-end feel. A natural wood base, walnut, oak, or a butcher-block top, paired with stone elsewhere brings organic texture that an all-painted kitchen lacks. The mix of warm wood against cool stone is what makes it look designed.
The most-copied version is a two-material island: a wood base with a marble or quartz top, or a stone waterfall end on a wood island. It pairs beautifully with a white or sage kitchen and adds the warmth buyers love. I recommend sealing a butcher-block top well if you will prep on it, re-oiling it every few months, and keeping the wood away from the sink splash zone.
- Pair a wood base with a stone top for warmth and a custom feel.
- Use a two-material island to mix warm wood and cool stone.
- Seal butcher block and keep wood out of the sink splash zone.
Sleek Minimalist Island Design

At the modern end, the minimalist island looks like a single clean slab and hides all its work. Handleless cabinets, an integrated or waterfall stone top, and no visible hardware make the island look like one quiet sculptural form, which is the whole appeal in a contemporary open kitchen.
The copied detail here is the waterfall: stone that runs down the sides to the floor, turning the island into a monolith. It costs more, since it uses extra slab. But it is the move that makes a minimalist island look custom. Keep the seating tucked fully under and the top clear, and the island becomes a calm anchor.
👍Wood-and-stone islands win on
- +Warmth an all-painted kitchen lacks
- +An organic, high-end look
- +Pairing with almost any cabinet color
👎But watch
- –Butcher block needs sealing and oiling
- –Wood near water can warp over time
- –Two premium materials add cost
Functional Rustic Island Design

The rustic island suits people who want their kitchen to look like it actually cooks. A chunky wood base, a worn or butcher-block top, open shelving on the ends for cookbooks and baskets, and a pot rail overhead give it that warm, working-farmhouse character everyone copies for a cozy kitchen.
Function leads the look here. Open shelves and hooks keep tools and pretty cookware on display and within reach, and a big, sturdy top handles real prep, kneading, canning, a crowd of helpers. Distressed or reclaimed wood hides wear, which makes this setup forgiving for a busy family.
Pair it with a farmhouse sink and a few vintage touches and the rustic island becomes the heart of the room. It is the setup that invites people to gather, lean, and help, which is the whole point of a farmhouse kitchen.
Bold Colorful Kitchen Islands

When white feels too safe, a bold-colored island is the setup that gets copied for instant personality. I love a painted island for the drama it brings. No other cabinet has to commit. Because the island anchors the room, that one hit of green, navy, black, or terracotta carries the whole space. The copy-worthy trick is to keep the perimeter calm, white or wood, so the island stays the centerpiece.
A few quarts of cabinet paint, roughly $200 to $400 for a DIY weekend, makes it one of the cheapest high-impact upgrades there is, and a coat dries in a couple of hours. It is reversible if your taste shifts, the same low-risk thinking behind a green kitchen island as an investment.
- Paint just the island a bold color for drama without full commitment.
- Keep the perimeter calm so the island stays the centerpiece.
- Use cabinet paint for a cheap, reversible high-impact upgrade.
📋Copy-Worthy Island Features
- ✓Storage built into every side or end
- ✓A 12-inch overhang for comfortable stool seating
- ✓36 to 42 inches of clearance all around
- ✓A contrasting color or material from the perimeter
- ✓One real function: prep sink, cooktop, or open shelving
Industrial-Style Island Features

The industrial island brings an urban, loft-like edge. A metal base or stainless top, black-framed open shelving, exposed brackets, and a butcher-block or concrete surface give it that raw, restaurant-kitchen character. A row of black pendants overhead seals the look.
A stainless top or a freestanding stainless prep table is the most-copied piece here, since it looks pro and wipes clean like a real commercial kitchen. Soften the hard materials with wood stools or a warm-wood top so it does not feel cold, and the industrial island balances edge with comfort.
This setup suits modern lofts and open-plan kitchens with the ceiling height to carry it. Keep the rest of the kitchen simple and let the island’s materials be the statement, which is how the look stays intentional.
A Bright Minimalist Focal-Point Island

Slightly different from the all-hidden minimalist island is the bright focal-point version: a light, sculptural island meant to draw the eye in an airy kitchen. A pale stone waterfall, a rounded or curved end, or a single dramatic vein in the slab makes the island itself the art.
Let one sculptural island be the art
The copied move is shape. Curved and rounded islands have taken over from hard rectangles because they soften an open room and improve flow, with no sharp corner to walk into, which is why curved island shapes designers love keep spreading. A waterfall edge in a bright stone catches the light and makes even a simple island feel like a centerpiece.
Keep everything around it quiet so the island stays the star. In a bright, minimal kitchen, the focal-point island is the one element allowed to show off, and it carries the whole design.
Clever Small Kitchen Islands

Not every kitchen has room for a big island, and the small-island setups people copy are clever about it. A slim island, a rolling cart on casters, or a compact island with a drop leaf all work. Each gives you prep space and a little seating without the clearance a full island demands.
Go slim, mobile, or peninsula in a small kitchen
The trick in a small kitchen is mobility and double duty. A cart you can roll out of the way, an island that seats two on one side, or a narrow run with storage below all add function without choking the floor. I tell clients to keep at least 36 inches of clearance even with a small island, or it defeats the purpose, the same discipline behind clever small kitchen island ideas.
A peninsula is the small-kitchen alternative that everyone copies, since it anchors to a wall and needs clearance on fewer sides. For tight open kitchens, it delivers the island experience in half the footprint.
Dual-Purpose Kitchen Islands

The most-copied modern island is the one that does two clear jobs at once, blurring the line between kitchen and living space. A prep island can carry a built-in dining extension or a lower table attached at one end. Add a microwave drawer and a charging station on the living-room side, and one piece becomes kitchen, dining, and command center.
The copy-worthy idea is to design the two zones into the island from the start: cooking on one side, gathering on the other, so the family naturally collects there. Add comfortable seating and a few outlets, and the dual-purpose island becomes the busiest surface in the whole home, especially with the right bar stool and island combo.
- Combine prep and dining in one island with a table extension.
- Add a microwave drawer, outlets, or charging on the living-room side.
- Design the cooking and gathering zones in from the start.
How to Ask Your Stylist
If you are working with a designer or contractor on an island, a few smart questions get you a setup worth copying. Ask whether your floor space really fits an island with full clearance, or whether a peninsula would serve you better, since pros will often steer you smaller than you expect. Ask what the island will actually do, prep, seating, sink, storage, before anyone talks about looks, because function should drive the size and the plumbing.
Get specific on the details that make or break it. Ask about overhang depth for comfortable seating, whether a waterfall or two-tone finish fits the budget, and how the island’s storage is configured inside, since deep drawers beat cabinets for most uses. And ask about cost honestly: a custom island can run from a couple thousand to well over ten, so knowing the number early keeps the dream and the budget in the same room.
Kitchen Island Questions, Answered
?How much clearance do you need around a kitchen island?
At least 36 inches on every side, and 42 to 48 inches where you cook or two people pass. Less than 36 inches turns the island into an obstacle. You generally need roughly 7 by 13 feet of free floor to fit a standard island with proper clearance, so measure before you commit.
?What size should a kitchen island be?
A useful island is at least 40 by 40 inches and about 36 inches tall, but the right size depends on your room and clearances. For seating, allow about 24 inches of width per stool and a 12-inch overhang for knees. In a small kitchen, a slim island or peninsula often works better than a full one.
?How much does a kitchen island cost?
A lot depends on materials and whether it includes a sink or cooktop. A simple stock-cabinet island with a basic top can run a few hundred to a couple thousand dollars, while a custom island with stone, a waterfall edge, and plumbing can climb past ten thousand. Painting an existing island is the cheapest upgrade, often $200 to $400 in a DIY weekend.
The Island That Anchors It All
Look closely at the kitchen islands everyone copies and the same lessons repeat: sized to the room with real clearance, styled to match and anchor the space, and built to do several jobs at once. Whether it is a timeless white classic, a warm wood-and-stone mix, a bold painted statement, or a clever small-space solution, the copy-worthy island earns its place by working as hard as it looks good.
So before you fall for a photo, it is worth asking: what do you actually need your island to do, and does your room have room for it to do that well? Answer those two questions honestly, and you will end up with the kind of island other people quietly copy, instead of the kind you wish you had sized differently.


